
Docker + ECS + Fargate
- Develop a site with node using Docker
- Create an docker image optimized for production and host it on Docker hub
- Use Fargate manually to put the site online
- Update the site
- Create a new docker image for production and host it on ECR
- Use ecs-cli to put the site online

Install the project
Get the code from this github repository :
# download the code
$ git clone \
    --depth 1 \
    https://github.com/jeromedecoster/docker-ecs-fargate.git \
    /tmp/aws

# cd
$ cd /tmp/aws
Run the site locally
Let’s start by seeing the site locally.
The site uses express and ejs. In the development phase we also use nodemon and livereload.
{
  "dependencies": {
    "ejs": "^3.1.3",
    "express": "^4.17.1"
  },
  "devDependencies": {
    "connect-livereload": "^0.6.1",
    "livereload": "^0.9.1",
    "nodemon": "^2.0.4"
  }
}
We install the packages :
$ npm install
The Makefile allows you to run the development version or the production version :
dev: # start the site with nodemon and livereload
	npx livereload . --wait 200 --extraExts 'ejs' & \
	NODE_ENV=development npx nodemon --ext js,json index.js

prod: # start the site in production environment
	NODE_ENV=production node index.js
We launch the development version:
$ make dev
Run the site locally with Docker
There are different approaches to local development with Docker.
We will use this :
- The build + run method with the use of a Docker volume for local updates.
- We will use the multi-stage builds to minimize build time as much as possible.
- We will also use two separate Dockerfiles for the development and production to simplify their writing.
There are many Docker images of node.
The most used are the versions latest, slim and apline.
We download them :
$ docker pull --quiet node:14.3
$ docker pull --quiet node:14.3-slim
$ docker pull --quiet node:14.3-alpine
The three images have really different sizes :
$ docker images node
REPOSITORY          TAG                 IMAGE ID            CREATED             SIZE
node                14.3-alpine         72eea7c426fc        5 days ago          117MB
node                14.3-slim           8ec3841e41bb        5 days ago          165MB
node                14.3                91a3cf793116        5 days ago          942MB
Using the alpine version is tempting, but you can sometimes run into problems. This blog post concerns Python but it remains valid for Node :
- For the development phase we will use the slim version.
- The image used in production uses the alpine version.
The env.dev.dockerfile file :
FROM node:14.3-slim AS build
WORKDIR /app
ADD package.json package.json
RUN npm install

FROM node:14.3-slim
WORKDIR /app
COPY --from=build /app .
ADD . .
EXPOSE 3000
CMD ["./dev.sh"]
To build the Docker image we execute this command :
$ docker image build \
    --file env.dev.dockerfile \
    --tag site \
    .
Or more simply :
$ make dev-build
Now we have our site image as well as our intermediate image, the AS build version.
$ docker images
REPOSITORY            TAG                 IMAGE ID            CREATED              SIZE
site                  latest              21b812386d58        About a minute ago   181MB
<none>                <none>              011d9d84e2a4        About a minute ago   175MB
To start the container we execute the following command.
- We open
port 3000for the node server. - And
port 35729for the livereload server.
docker run \
    --name site \
    --publish 3000:3000 \
    --publish 35729:35729 \
    --volume "$PWD:/app" \
    site
Or more simply :
$ make dev-run
If we change the sources, the site updates instantly.
We modify the style.css file :
img {
    max-height: 600px;
    border: 5px solid #fff;
    box-shadow: 0px 6px 10px -2px #999;
}
Hosting the production image on the docker hub
Now we want to host our image on docker hub.
I will host this image on my account. You need to create an account.
We use a specific Dockerfile for production, env.prod.dockerfile :
FROM softonic/node-prune AS prune

FROM node:14.3-slim AS build
WORKDIR /app
COPY --from=prune /go/bin/node-prune /usr/local/bin/
ADD . .
RUN npm install --only=prod
RUN node-prune

FROM node:14.3-alpine
ENV NODE_ENV production
ENV PORT 80
WORKDIR /app
COPY --from=build /app .
EXPOSE 80
CMD ["node", "index.js"]
Some remarks about this Dockerfile :
- It uses node-prune via a specific image.
- It copies the node-prune executable from
prunetobuild. - It installs the npm packages with the
--only=prodoption to not install thedevDependenciespackages. - Then it runs node-prune to delete unnecessary files.
- Final image uses
14.3-alpineto minimize weight. - The final image declares 2 environment variables for the node server :
NODE_ENVandPORT.
Important : Fargate work with the
awsvpcNetwork Mode. This means that we cannot do port mapping, redirectport 80toport 3000.
Our production server must listen the port 80.
Some remarks to build our production image :
- To tag an image for docker hub you must respect the format
<user>/<image>or<user>/<image>:<tag>. - We create 2 tags : one for
:latestwhich is omitted, another for:0.1.0, which is the current version.
We build the image with this command :
$ docker image build \
    --file env.prod.dockerfile \
    --tag jeromedecoster/site \
    --tag jeromedecoster/site:0.1.0 \
    .
Or more simply :
$ make prod-build
To start the container we execute the following command.
- We open
port 80for the node server.
$ docker run \
    --name site \
    --publish 80:80 \
    jeromedecoster/site
Or more simply :
$ make prod-run
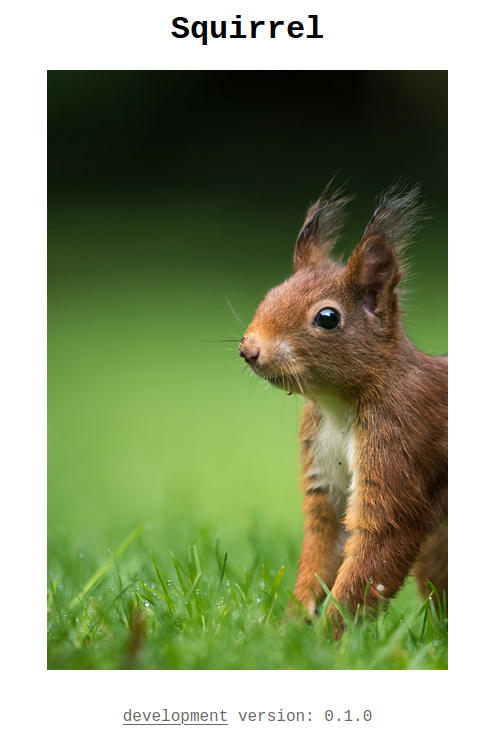
If we open http://localhost we see :
We put the tagged image 0.1.0 on docker hub with the docker push command :
$ docker push jeromedecoster/site:0.1.0
We will then push the latest tag. As the layers already exist, the upload is useless and the action is almost instantaneous :
$ docker push jeromedecoster/site:latest
The push refers to repository [docker.io/jeromedecoster/site]
dc28c82abf6a: Layer already exists
ac36867bb244: Layer already exists
d952e2787940: Layer already exists
ac91e43942f7: Layer already exists
c314a2fc89cb: Layer already exists
7480ff3a7cf4: Layer already exists
daee265ea6cb: Layer already exists
83b43189420d: Layer already exists

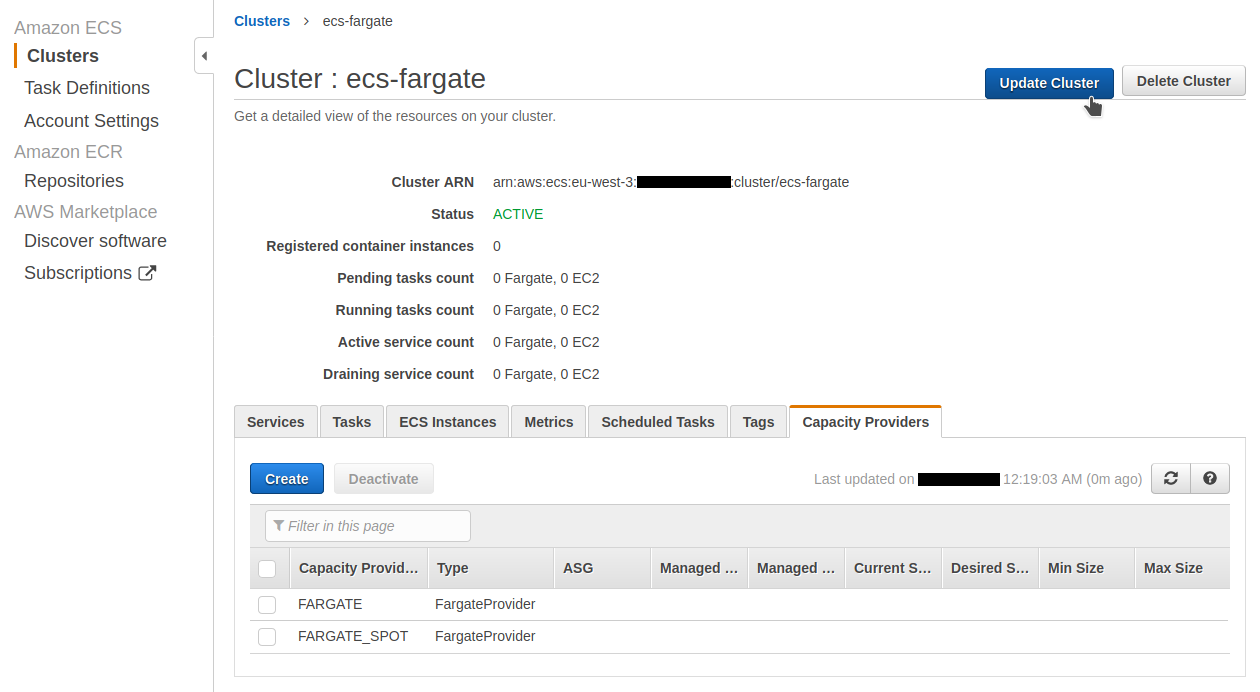
Start the Docker image in ECS FARGATE
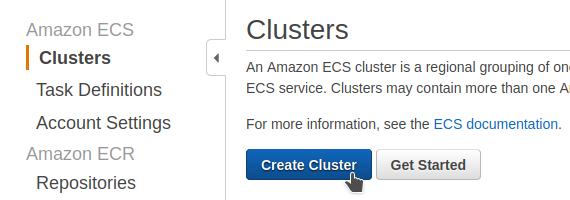
Now we are going to start this production image in an ECS FARGATE cluster.
We create a cluster via the EC2 interface :
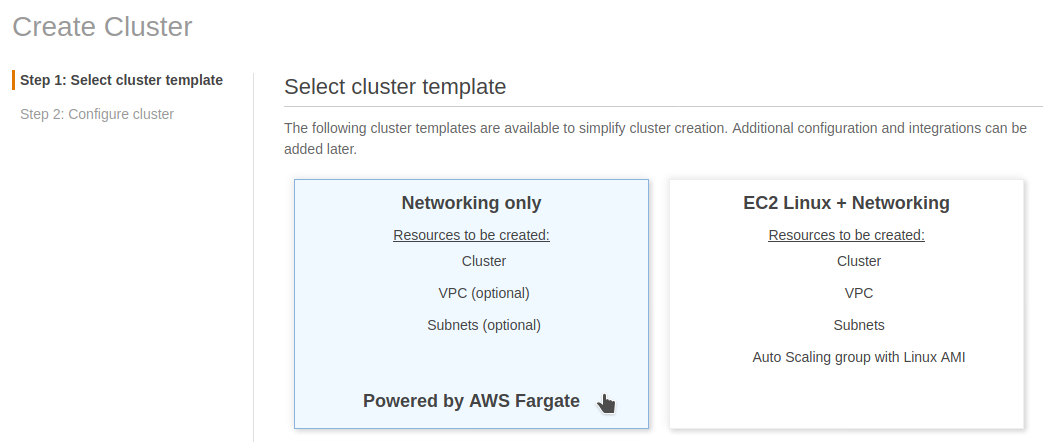
We choose Networking only :
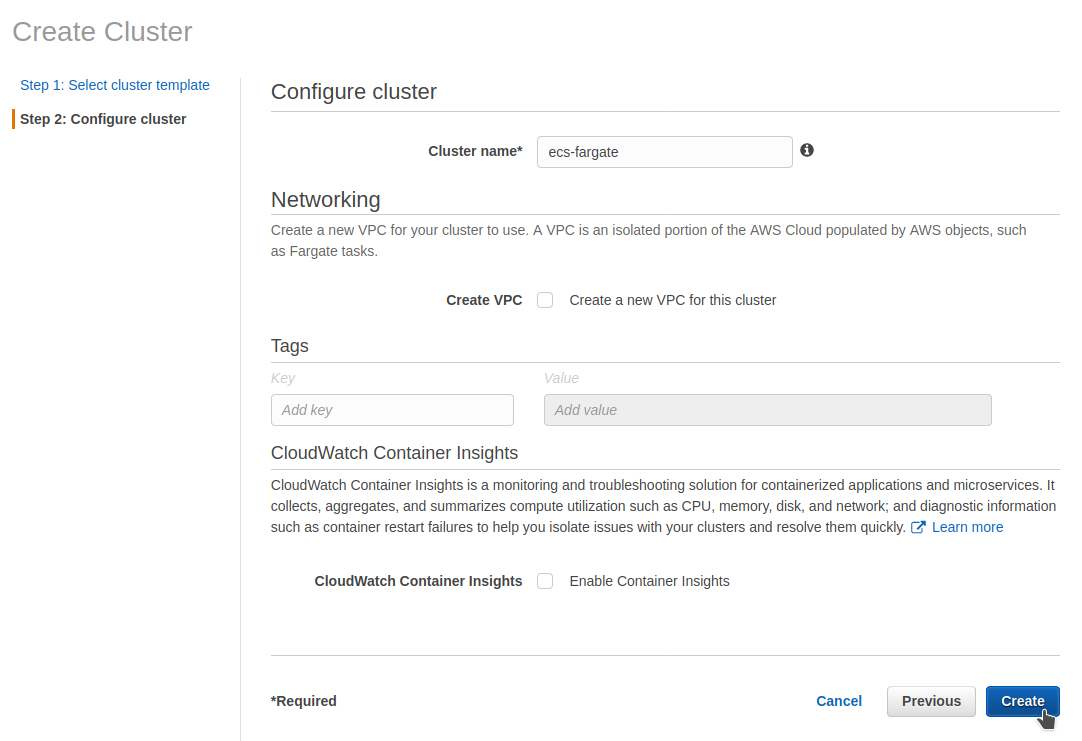
We name it ecs-fargate :
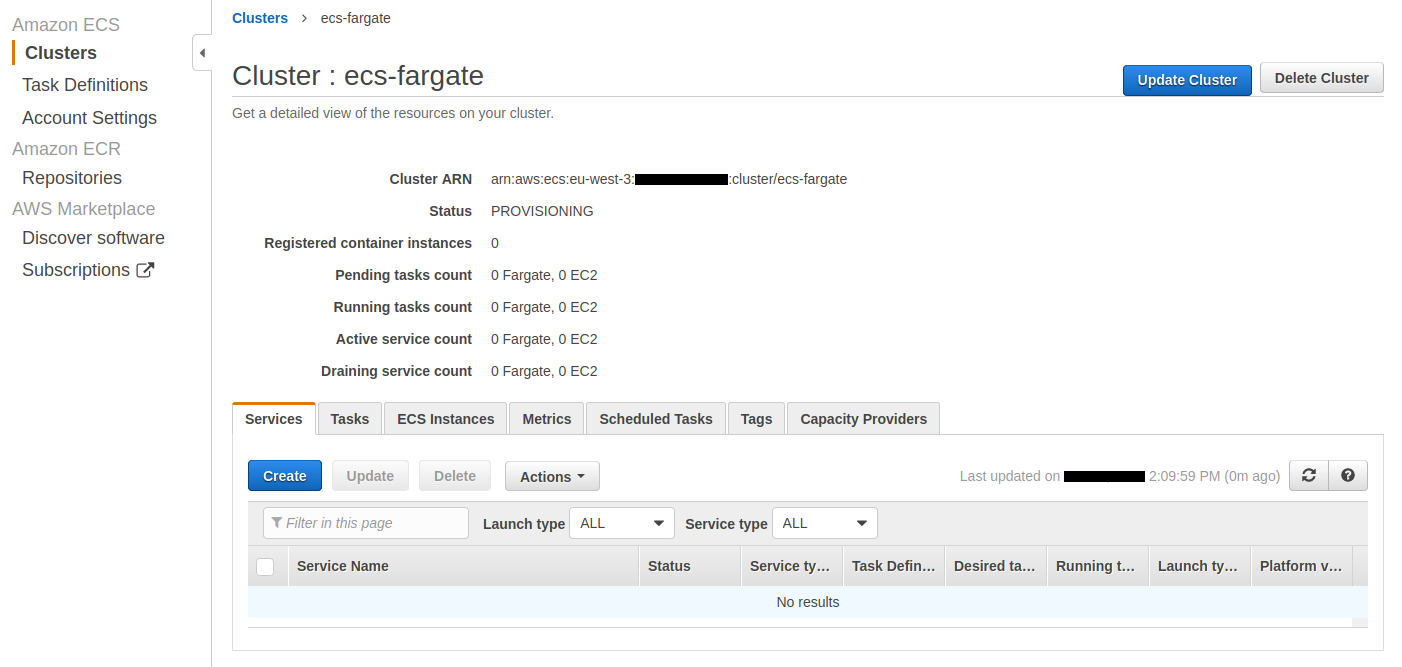
The cluster is created :
To complete the creation of the cluster, you must define its capacity provider property.
The Capacity Providers tab is selected. We click the Update Cluster button :
We will choose the default capacity provider strategy :
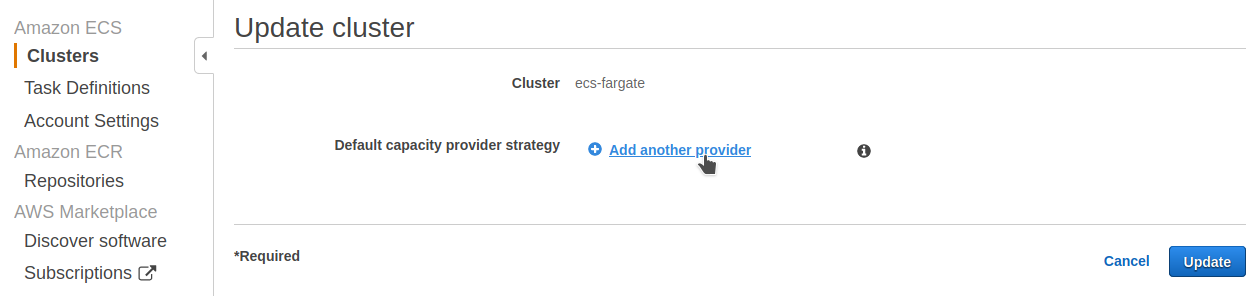
We choose FARGATE_SPOT for this demonstration.
For a real production site we should of course choose FARGATE.

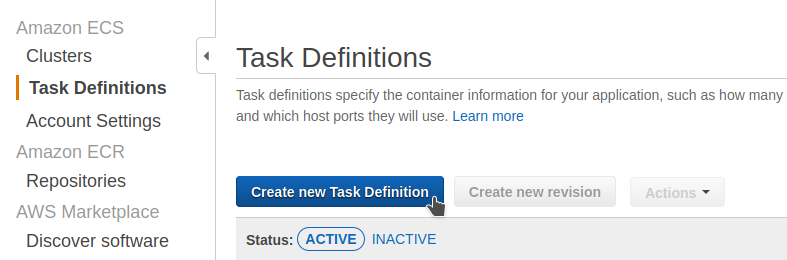
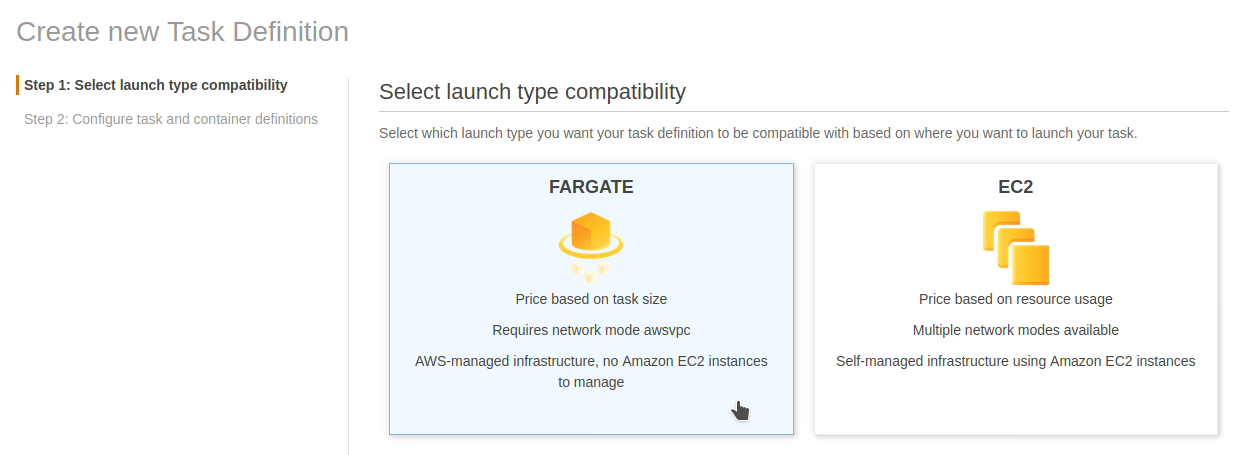
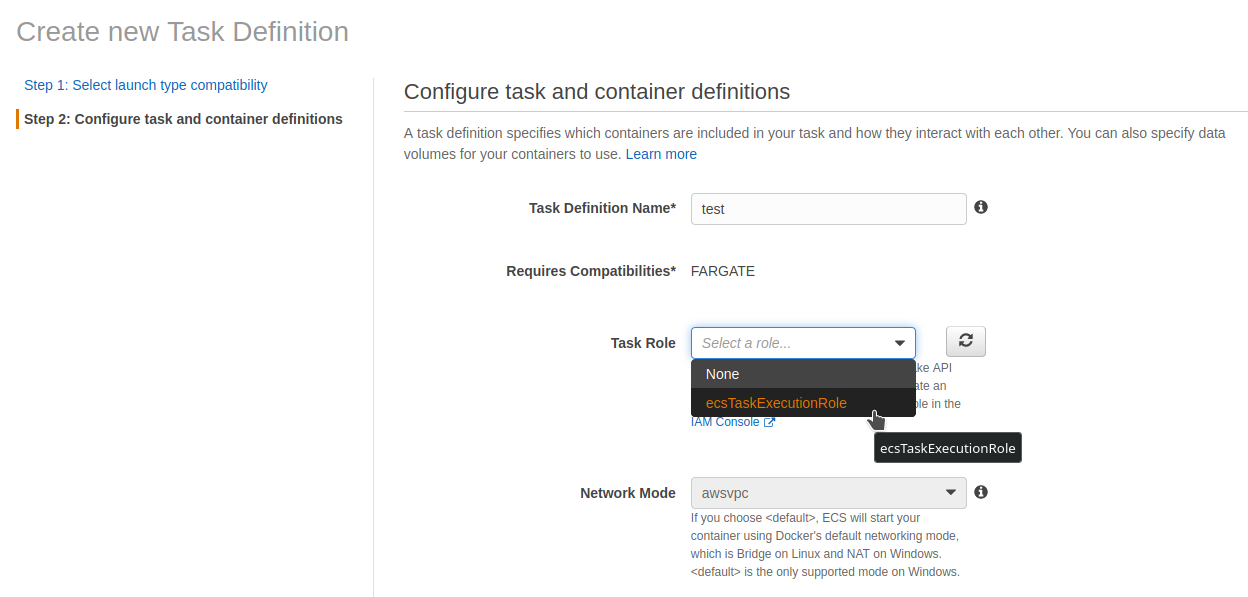
We will create a task definition :
We choose FARGATE :
We give the name test and choose the role ecsTaskExecutionRole :
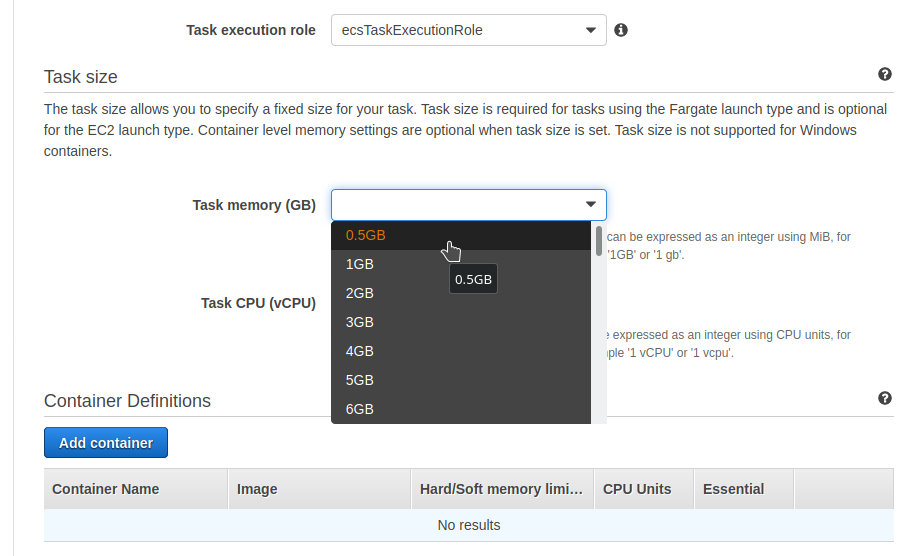
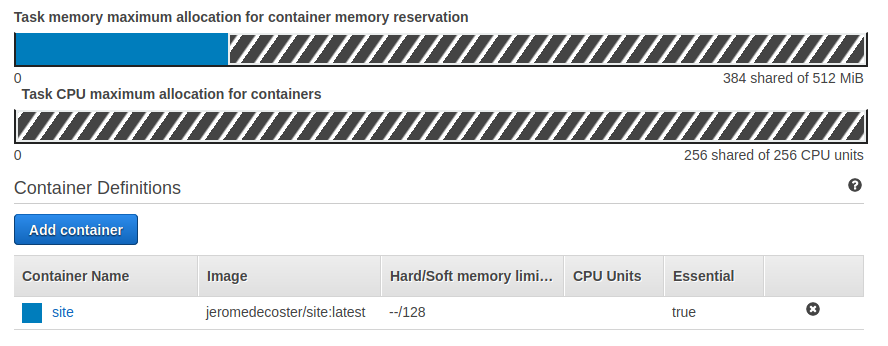
We choose the smallest value for the memory :
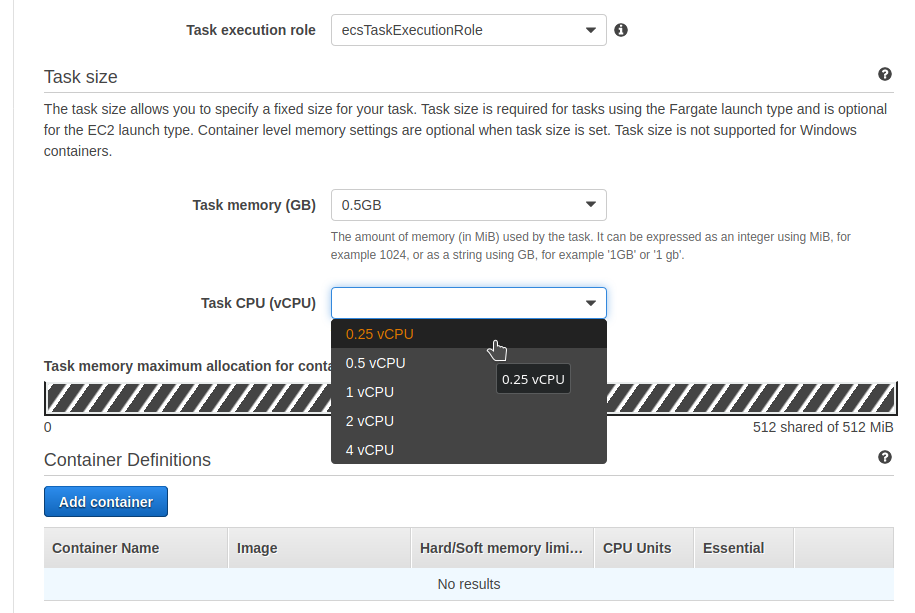
We choose the smallest value for the CPU :
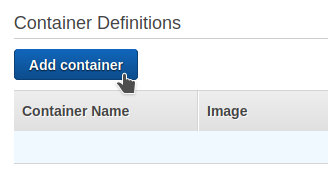
We will now define a container :
We use these values :
- Name :
site - Image :
jeromedecoster/site:latest - Soft limit :
128 - Port Mapping :
80
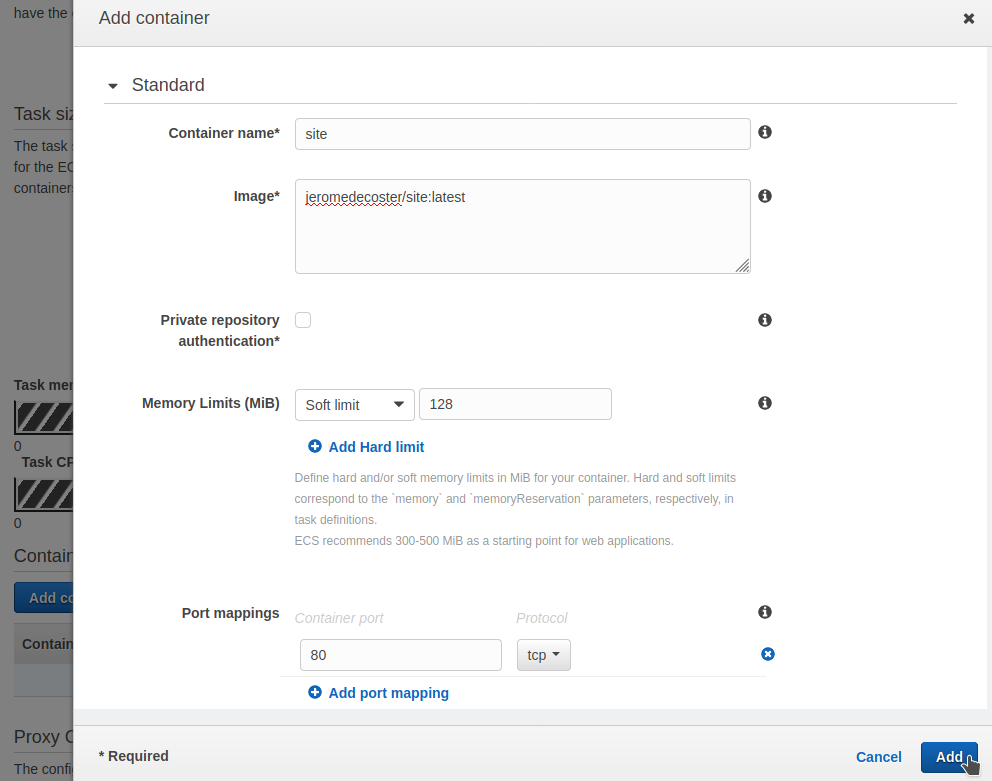
The container site is defined :
We have finished :

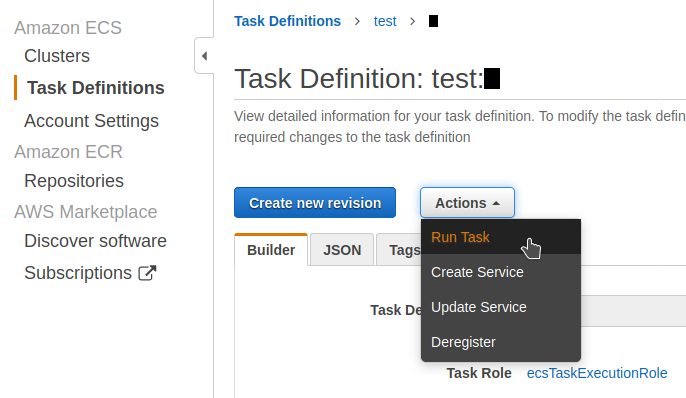
We will now run this task definition :
We use these values :
- Launch type :
FARGATE - VPC : the default VPC
- Subnets : all available subnets
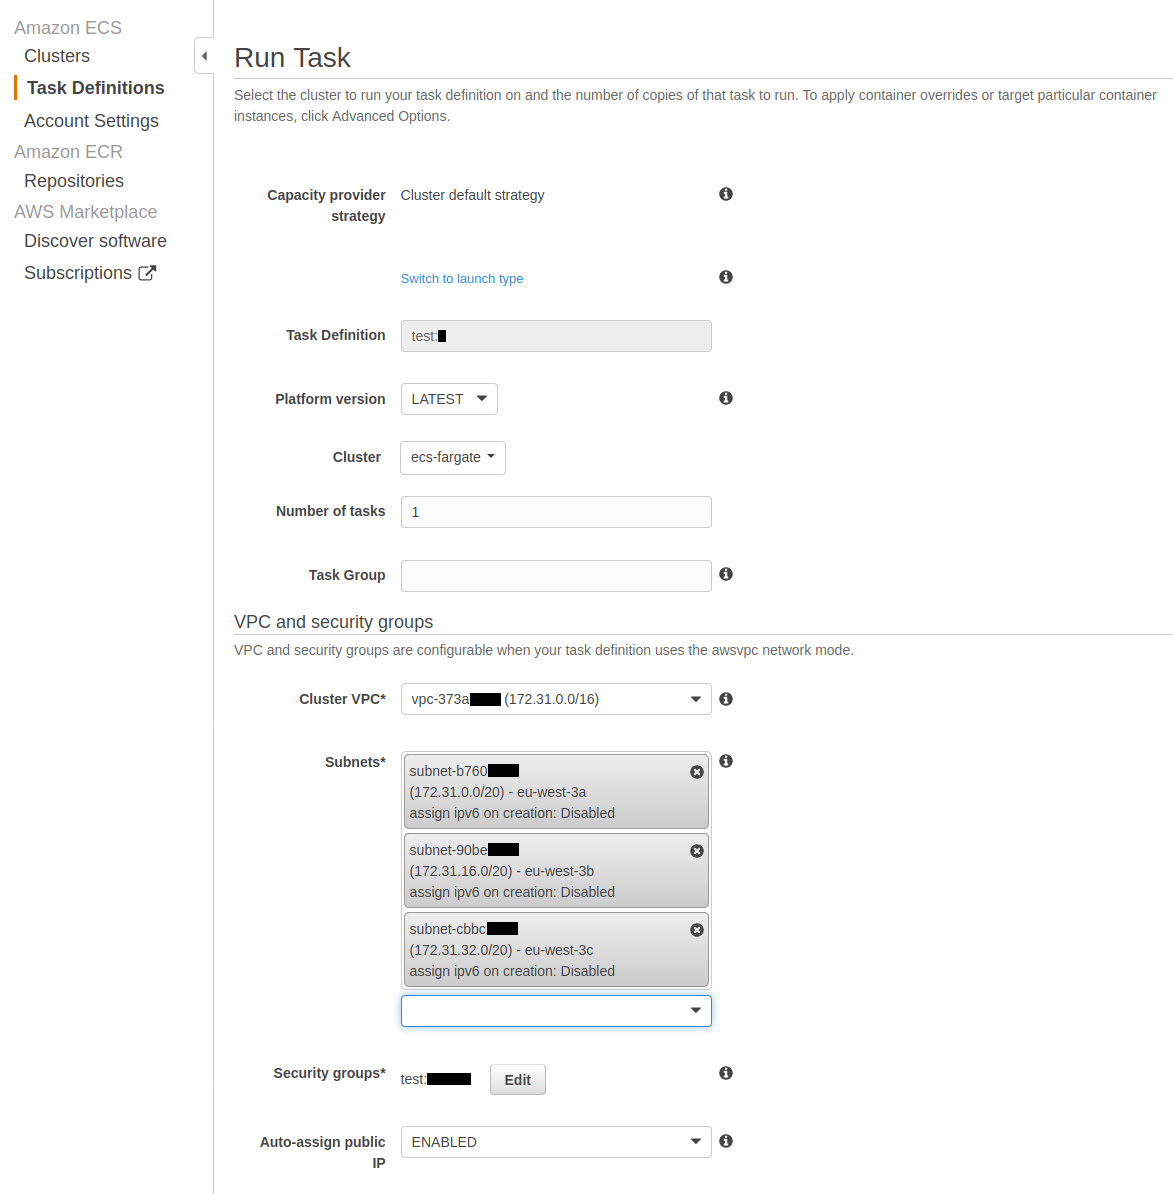
Then click run task :

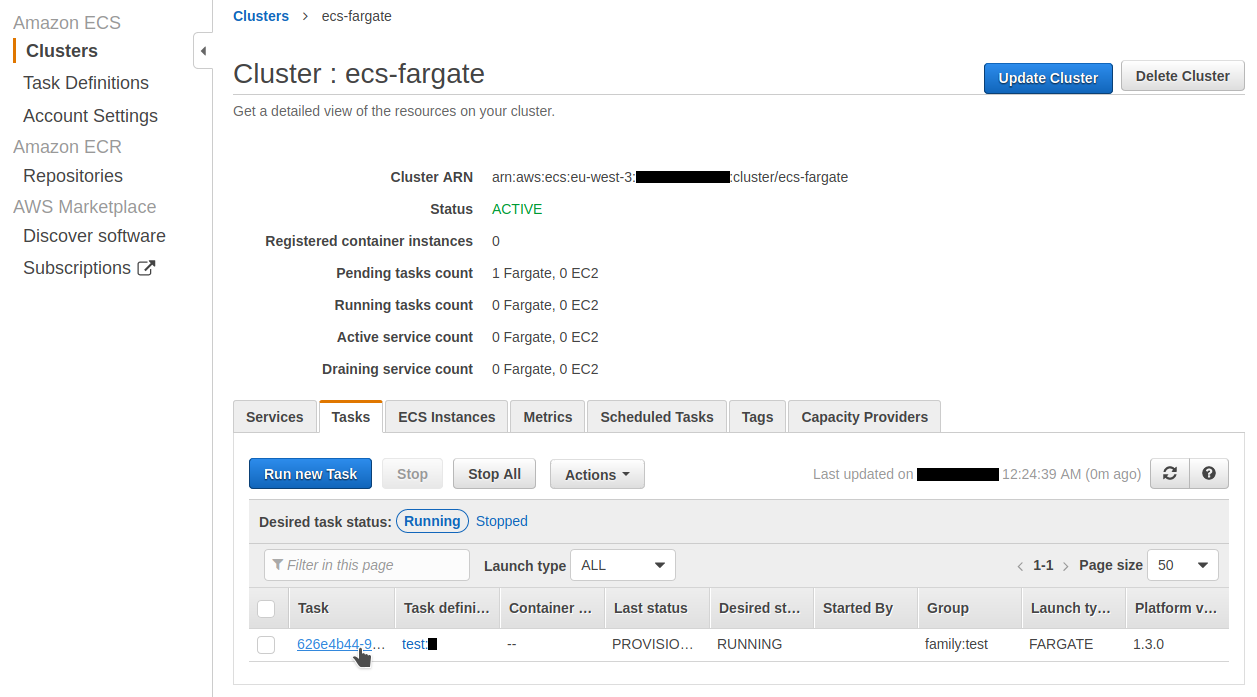
The task status is PROVISIONING.
We click the task id to open the detailed view :
After few seconds the task status is now RUNNING and we have the Public IP :
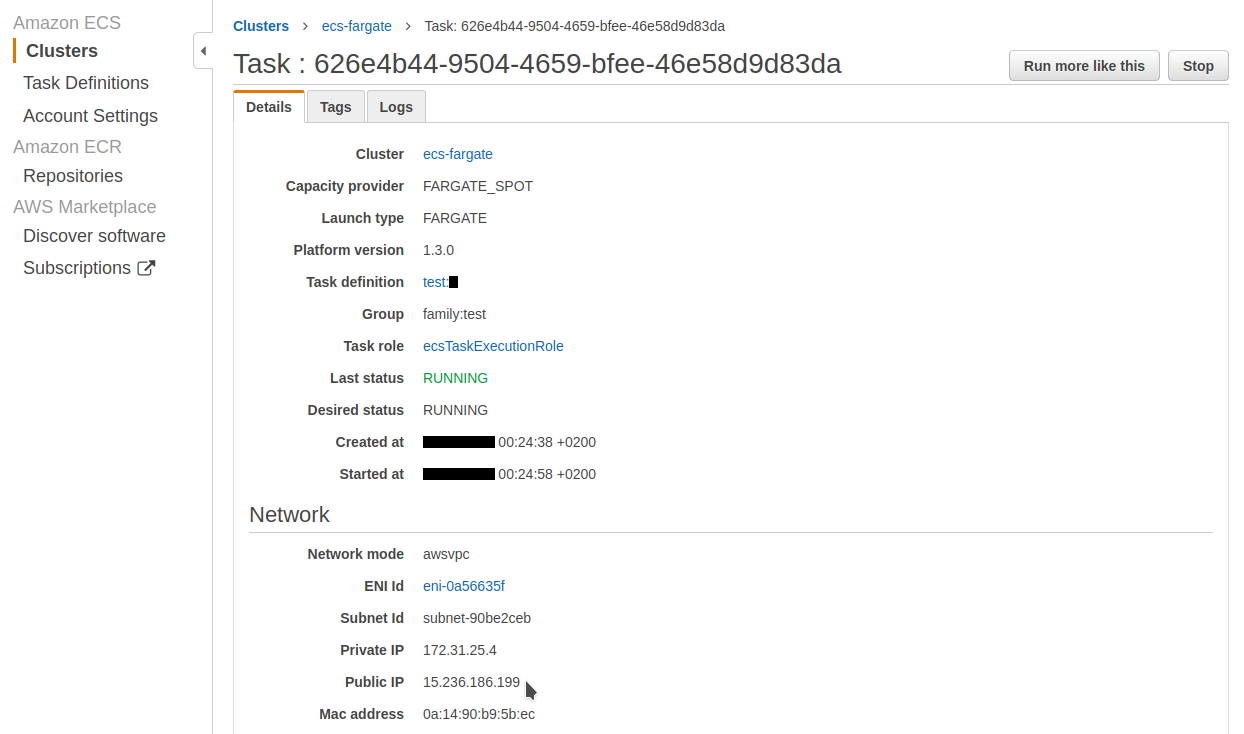
If we use this URL in our browser we see our great site :
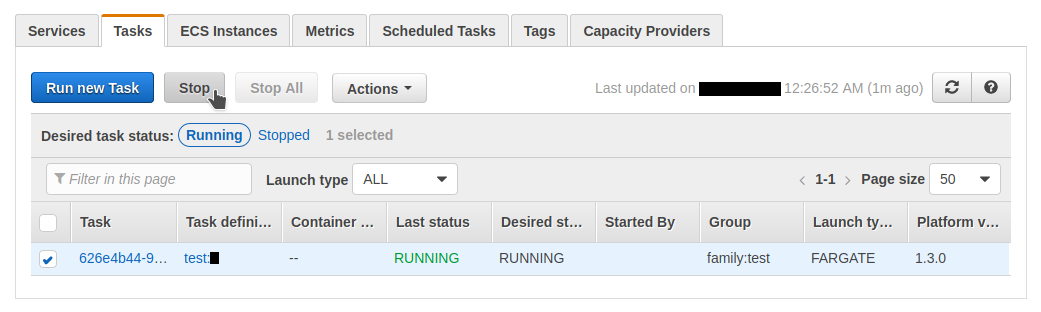
We can now stop our task :
Updating the site
We modify the file index.ejs to change the image of the squirrel :
- <img src="img/squirrel-1.jpg">
+ <img src="img/squirrel-2.jpg">
We modify the package.json file to change our version number :
{
  "name": "docker-ecs-fargate",
-  "version": "0.1.0",
+  "version": "0.2.0",
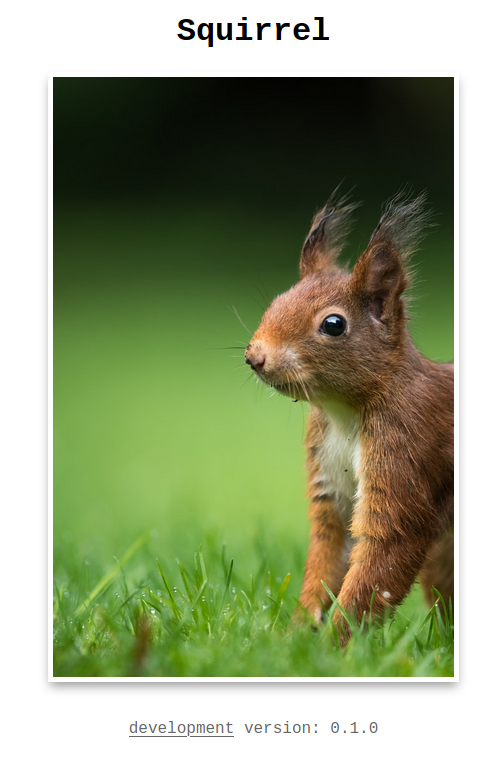
Our local page is reloaded and look like :

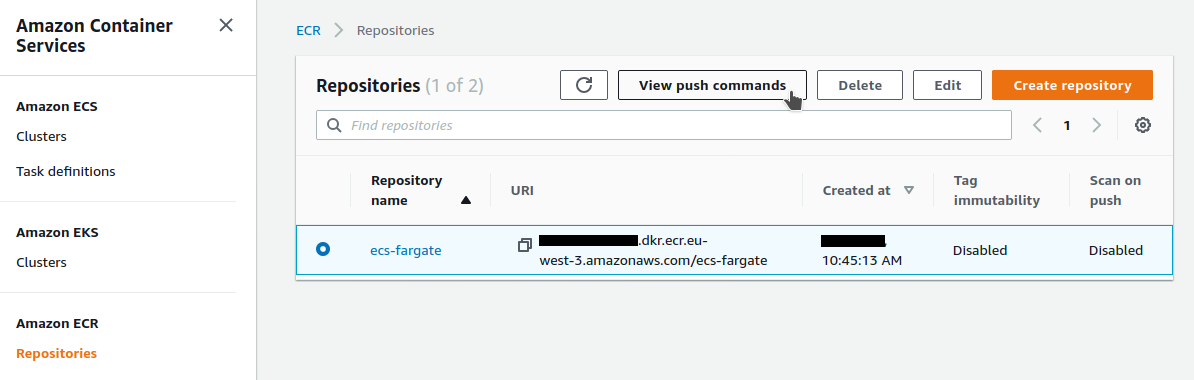
Hosting the docker image on ECR
We create a repository on ECR using aws cli. We get the URL of the repository :
$ aws ecr create-repository \
    --repository-name ecs-fargate
{
    "repository": {
        "repositoryArn": "arn:aws:ecr:eu-west-3:<aws-account-id>:repository/ecs-fargate",
        "repositoryName": "ecs-fargate",
        "repositoryUri": "<aws-account-id>.dkr.ecr.eu-west-3.amazonaws.com/ecs-fargate",
        "//": "..."
    }
}
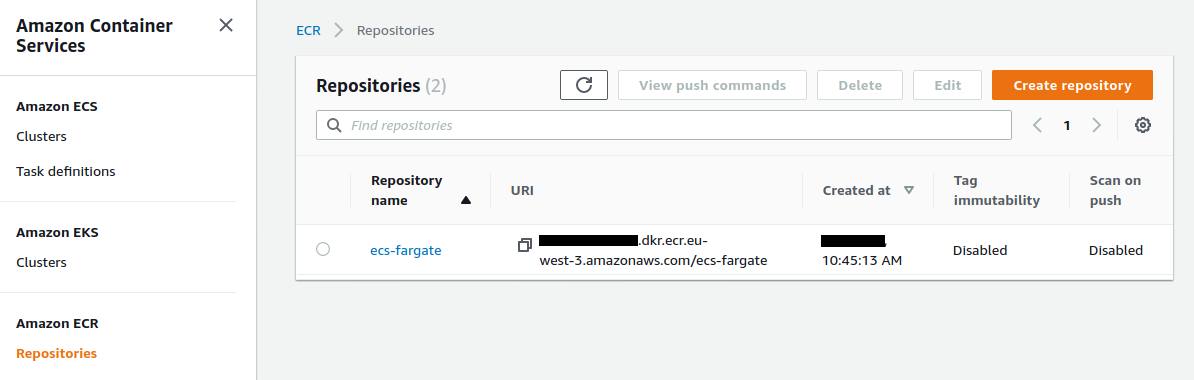
The repository has been created :
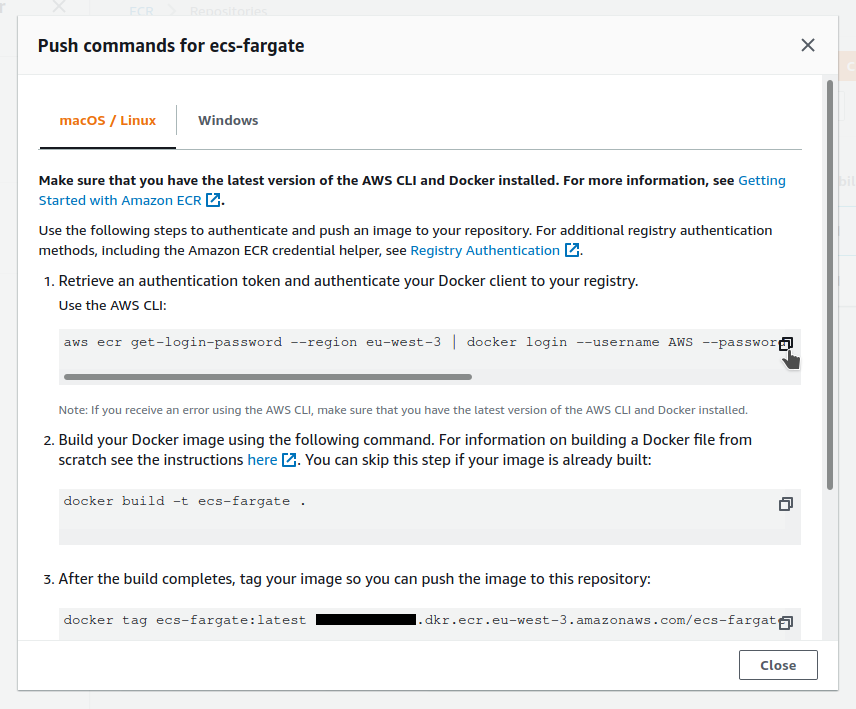
The View push commands button open a modal window containing all the information to push a docker image on this repository :
I copy the get-login-password command to the clipboard :
Let’s look at the current state of the docker config file :
$ cat /home/$USER/.docker/config.json
{
    "auths": {
        "https://index.docker.io/v1/": {
            "auth": "xxxxx"
        }
    },
    "HttpHeaders": {
        "User-Agent": "Docker-Client/19.03.8 (linux)"
    }
}
I execute the previously copied command :
$ aws ecr get-login-password \
    --region eu-west-3 \
    | docker login \
    --username AWS \
    --password-stdin xxxxx.dkr.ecr.eu-west-3.amazonaws.com
the docker config file has been updated :
$ cat /home/$USER/.docker/config.json
{
    "auths": {
        "xxxxx.dkr.ecr.eu-west-3.amazonaws.com": {
            "auth": "xxxxx"
        },
        "https://index.docker.io/v1/": {
            "auth": "xxxxx"
        }
    },
    "HttpHeaders": {
        "User-Agent": "Docker-Client/19.03.8 (linux)"
    }
}
We create the new production image with this make command :
$ make prod-ecr-build
Here is what is executed :
- The image is built with tags
ecs-fargate:latestandecs-fargate:0.2.0. - Tags are added with the URL of the ECR repository.
VERSION=$(node -e "console.log(require('./package.json').version)")
docker image build \
    --file env.prod.dockerfile \
    --tag ecs-fargate \
    --tag ecs-fargate:$VERSION \
    .

URL=$(aws ecr describe-repositories \
    --query "repositories[?repositoryName == 'ecs-fargate'].repositoryUri" \
    --output text)
docker tag ecs-fargate:latest "$URL:latest"
docker tag ecs-fargate:latest "$URL:$VERSION"
Our local images :
$ docker images
REPOSITORY            TAG                 IMAGE ID            CREATED             SIZE
xxxx.dkr.ecr.eu-wes.. 0.2.0               9f578704f1f6        51 minutes ago      119MB
xxxx.dkr.ecr.eu-wes.. latest              9f578704f1f6        51 minutes ago      119MB
ecs-fargate           0.2.0               9f578704f1f6        51 minutes ago      119MB
ecs-fargate           latest              9f578704f1f6        51 minutes ago      119MB
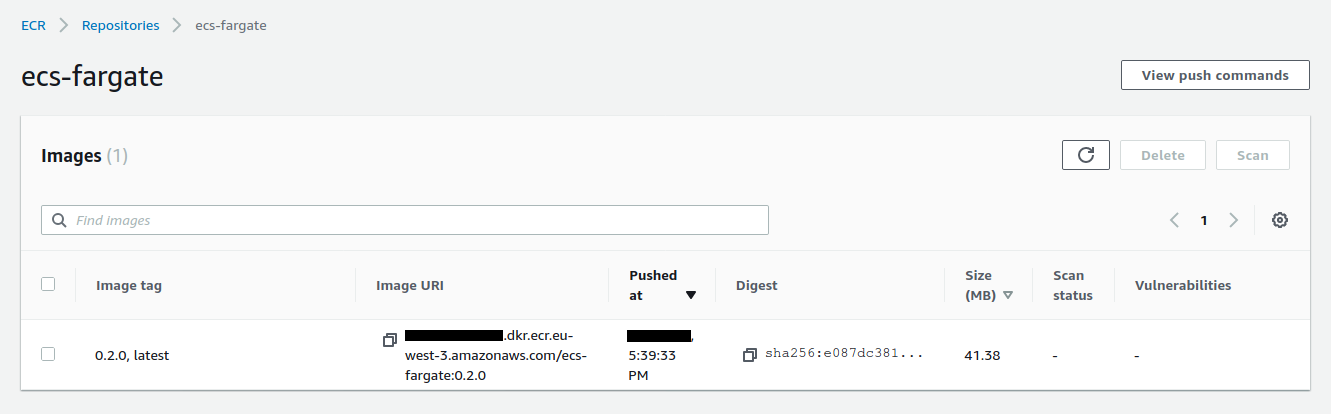
We can now push the latest version on ECR. It takes a few moments :
$ docker push xxxxx.dkr.ecr.eu-west-3.amazonaws.com/ecs-fargate:latest
The push refers to repository [xxxxx.dkr.ecr.eu-west-3.amazonaws.com/ecs-fargate]
539efa4f40fd: Pushed
35831c3230bc: Pushed
846843578a94: Pushed
333d276b2ed4: Pushed
e4c8c61d9c2a: Pushed
3e207b409db3: Pushed
Now we push the 0.2.0 version. The layers are already existing, it is almost instantaneous :
$ docker push xxxxx.dkr.ecr.eu-west-3.amazonaws.com/ecs-fargate:0.2.0
The push refers to repository [xxxxx.dkr.ecr.eu-west-3.amazonaws.com/ecs-fargate]
539efa4f40fd: Layer already exists
35831c3230bc: Layer already exists
846843578a94: Layer already exists
333d276b2ed4: Layer already exists
e4c8c61d9c2a: Layer already exists
3e207b409db3: Layer already exists
0.2.0: digest: sha256:e087dc381753ea1a997b7ae0afd3134a87c9973ad583e6c8af6a43cb7601a33a size: 1575
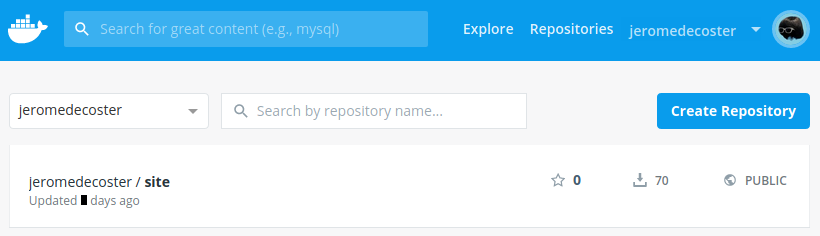
The image is hosted on ECR :
Use ecs-cli to start the image in ECS FARGATE
ecs-cli makes it easier to manage AWS ECS.
It is a specific tool, coded in Go, hosted on github.
The ecs-cli tool should not be confused with aws ecs commands, which are lower level.
The installation instructions.
# download
$ sudo curl https://amazon-ecs-cli.s3.amazonaws.com/ecs-cli-linux-amd64-latest \
    --output /usr/local/bin/ecs-cli

# make it executable
$ sudo chmod +x /usr/local/bin/ecs-cli
We configure our profile with our access and secret keys :
$ ecs-cli configure profile \
    --access-key xxxx \
    --secret-key xxxx
This creates a file ~/.ecs/credentials :
# read the credentials
$ cat ~/.ecs/credentials
version: v1
default: default
ecs_profiles:
  default:
    aws_access_key_id: xxxx
    aws_secret_access_key: xxxx
The option --profile-name is very useful :
$ ecs-cli configure profile \
    --access-key yyyy \
    --secret-key yyyy \
    --profile-name bob
Read the credentials again :
# read the credentials
$ cat ~/.ecs/credentials
version: v1
default: default
ecs_profiles:
  default:
    aws_access_key_id: xxxx
    aws_secret_access_key: xxxx
  bob:
    aws_access_key_id: yyyy
    aws_secret_access_key: yyyy
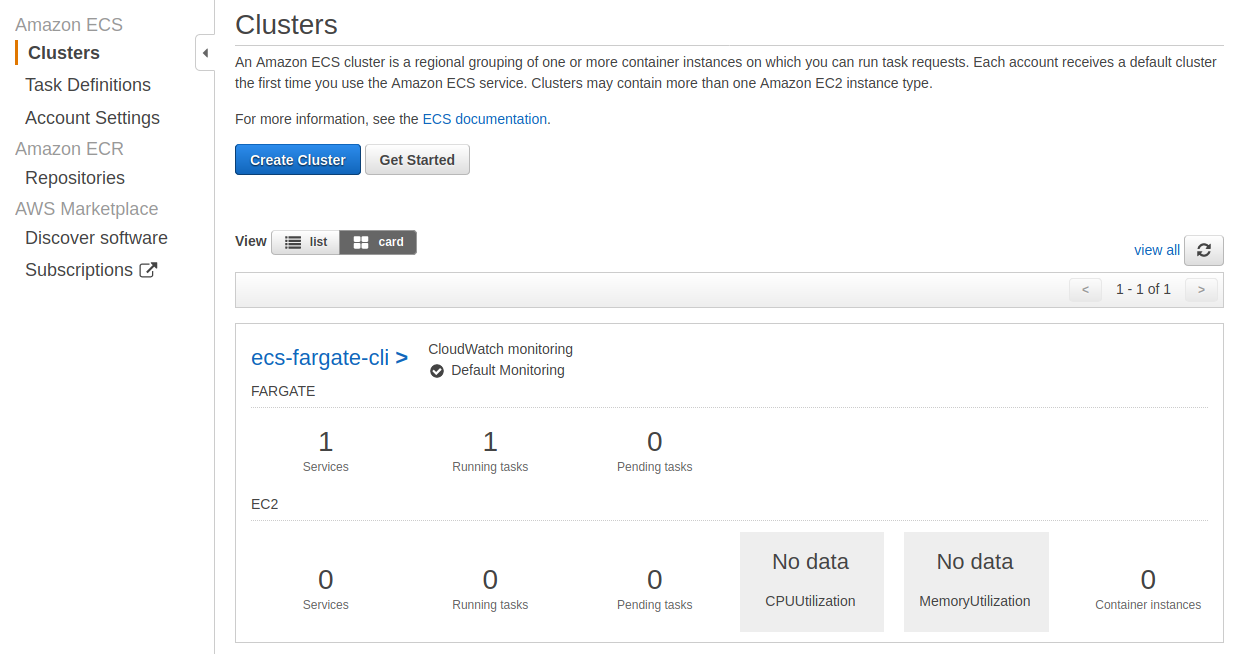
We configure ecs-cli to work on a new cluster called ecs-fargate-cli :
# configure a cluster
$ ecs-cli configure \
    --cluster ecs-fargate-cli \
    --region eu-west-3 \
    --default-launch-type FARGATE \
    --config-name ecs-fargate-cli

# set it as default (in case there are others)
$ ecs-cli configure default \
    --config-name ecs-fargate-cli
This creates a file ~/.ecs/config :
# read the config
$ cat ~/.ecs/config
version: v1
default: ecs-fargate-cli
clusters:
  ecs-fargate-cli:
    cluster: ecs-fargate-cli
    region: eu-west-3
    default_launch_type: FARGATE
Note that there is no command to delete this configuration.
If you want to clean the ~/.ecs/config file you have to do it manually.
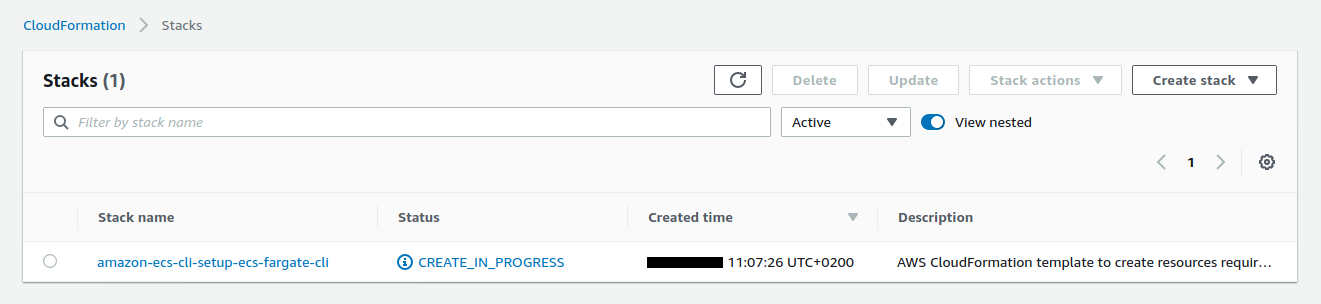
We create a cluster with up :
$ ecs-cli up \
    --cluster-config ecs-fargate-cli \
    --tags Name=ecs-fargate-cli
VPC created: vpc-09d18311f91fa1609
Subnet created: subnet-03eebf83eca2ddd9e
Subnet created: subnet-0f21c83cc59d140a9
Cluster creation succeeded.
This simple command creates a CloudFormation stack :
The list of resources created by this small command :

I used the -–tags option in the previous command to allows me to easily identify the VPC in the AWS interface :

And also the subnets :

The --tags options allow me to easily target these resources via aws cli.
I can get the id of my VPC :
$ aws ec2 describe-vpcs \
    --filters "Name=tag:Name,Values=ecs-fargate-cli" \
    --query "Vpcs[].VpcId" \
    --output text
vpc-09d18311f91fa1609
Get the id of the first subnet :
$ aws ec2 describe-subnets \
    --filters "Name=tag:Name,Values=ecs-fargate-cli" \
    --query "Subnets[0].SubnetId" \
    --output text
subnet-0f21c83cc59d140a9
Get the id of the second subnet :
$ aws ec2 describe-subnets \
    --filters "Name=tag:Name,Values=ecs-fargate-cli" \
    --query "Subnets[1].SubnetId" \
    --output text
subnet-03eebf83eca2ddd9e
Get the id of the security group :
$ aws ec2 describe-security-groups \
    --query "SecurityGroups[?VpcId == 'vpc-09d18311f91fa1609'].GroupId" \
    --output text
sg-0991f4877b441af14
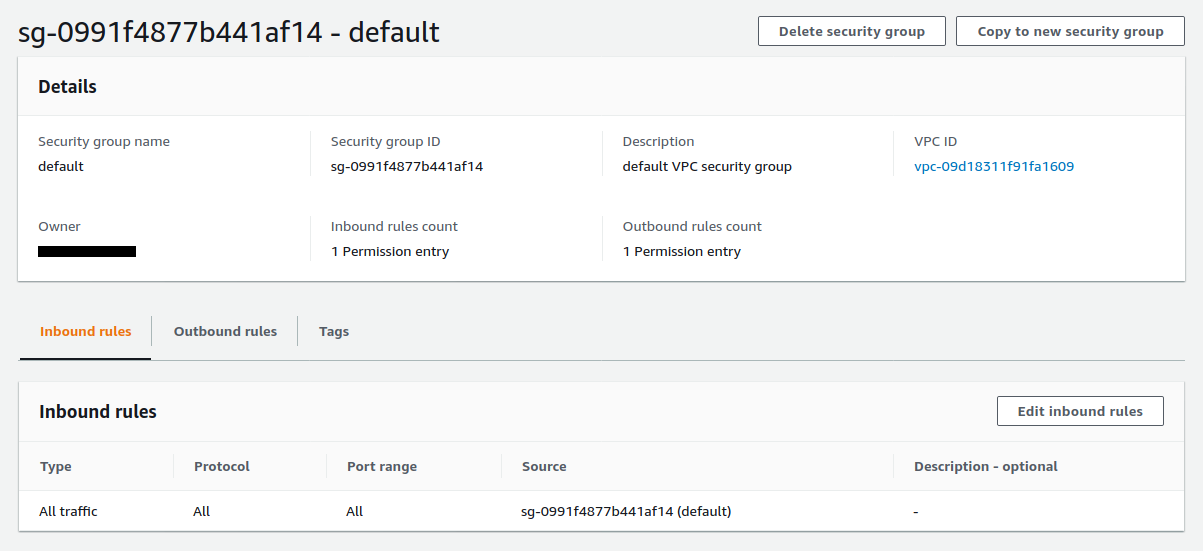
Let’s see the inbound rules for this security group :
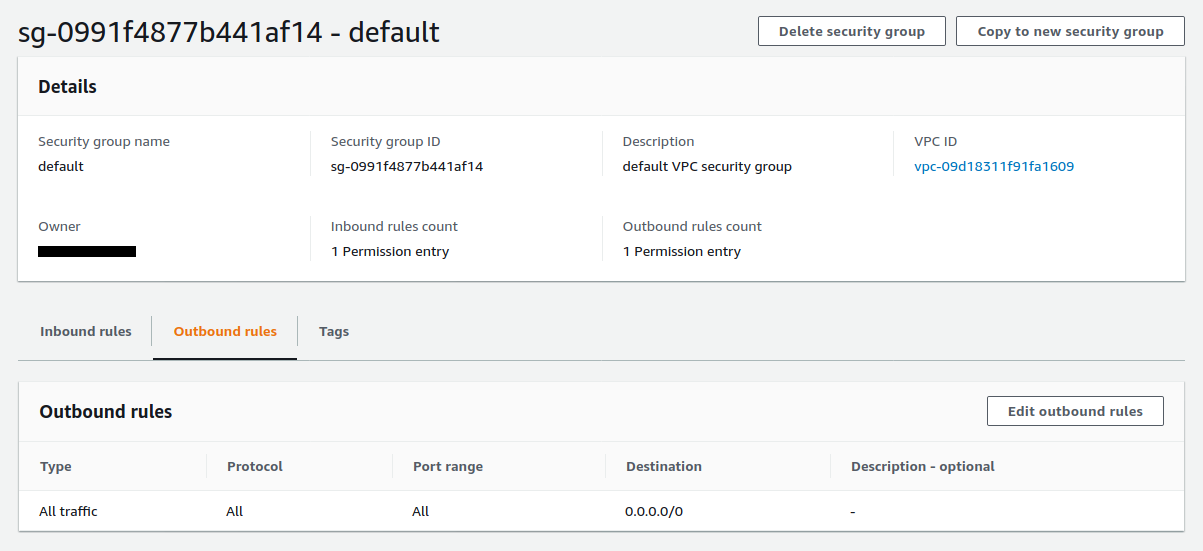
And the outbound rules :
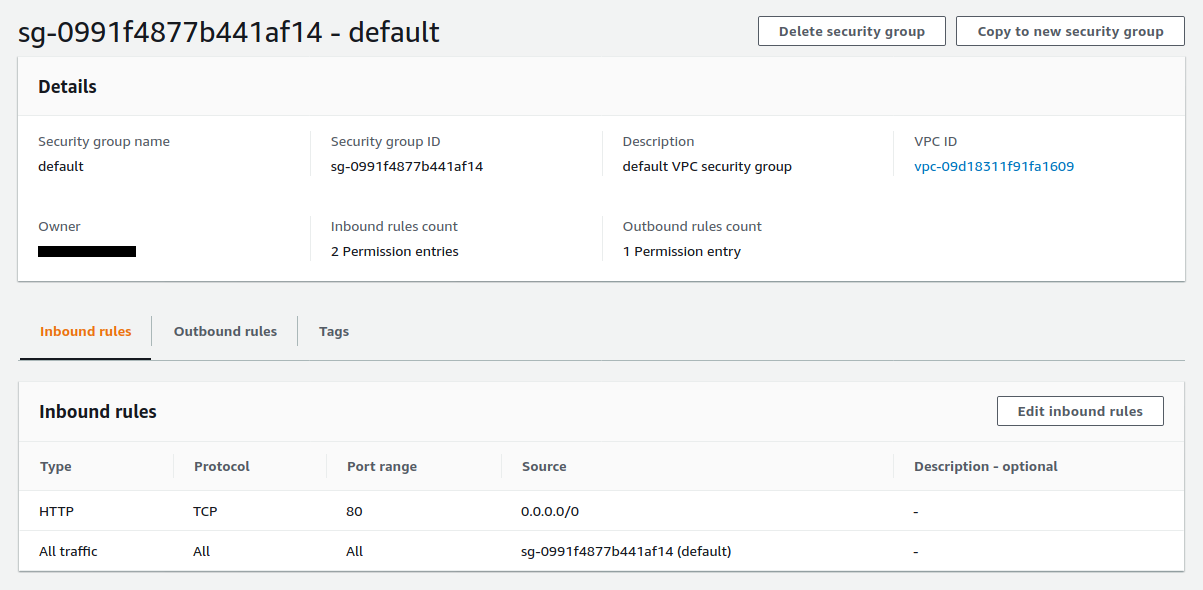
We need to allow the port 80 in the inbound rules with authorize-security-group-ingress :
$ aws ec2 authorize-security-group-ingress \
  --group-id sg-0991f4877b441af14 \
  --protocol tcp \
  --port 80 \
  --cidr 0.0.0.0/0 \
  --region eu-west-3
The rule is added :
One of the main advantages of ecs-cli is that it works directly with the docker-compose.yml file.
We need to create a docker-compose.yml file :
- Replace the
imagevalue with the value received.
version: '3'
services:
  site:
    image: xxxx.dkr.ecr.eu-west-3.amazonaws.com/ecs-fargate
    ports:
      - "80:80"
    logging:
      driver: awslogs
      options:
        awslogs-group: ecs-fargate-cli
        awslogs-region: eu-west-3
        awslogs-stream-prefix: site
Configuring ecs tasks and services requires a lot of options. We must create an ecs-params.yml file to define them :
- Replace the
subnetsandsecurity_groupsvalues with the values received.
version: 1
task_definition:
  task_execution_role: ecsTaskExecutionRole
  ecs_network_mode: awsvpc
  task_size:
    mem_limit: 0.5GB
    cpu_limit: 256
run_params:
  network_configuration:
    awsvpc_configuration:
      subnets:
        - "subnet-xxxx"
        - "subnet-xxxx"
      security_groups:
        - "sg-xxxx"
      assign_public_ip: ENABLED
We create a service with the compose service up command :
$ ecs-cli compose \
  --project-name ecs-fargate-cli \
  service up \
  --create-log-groups \
  --cluster-config ecs-fargate-cli
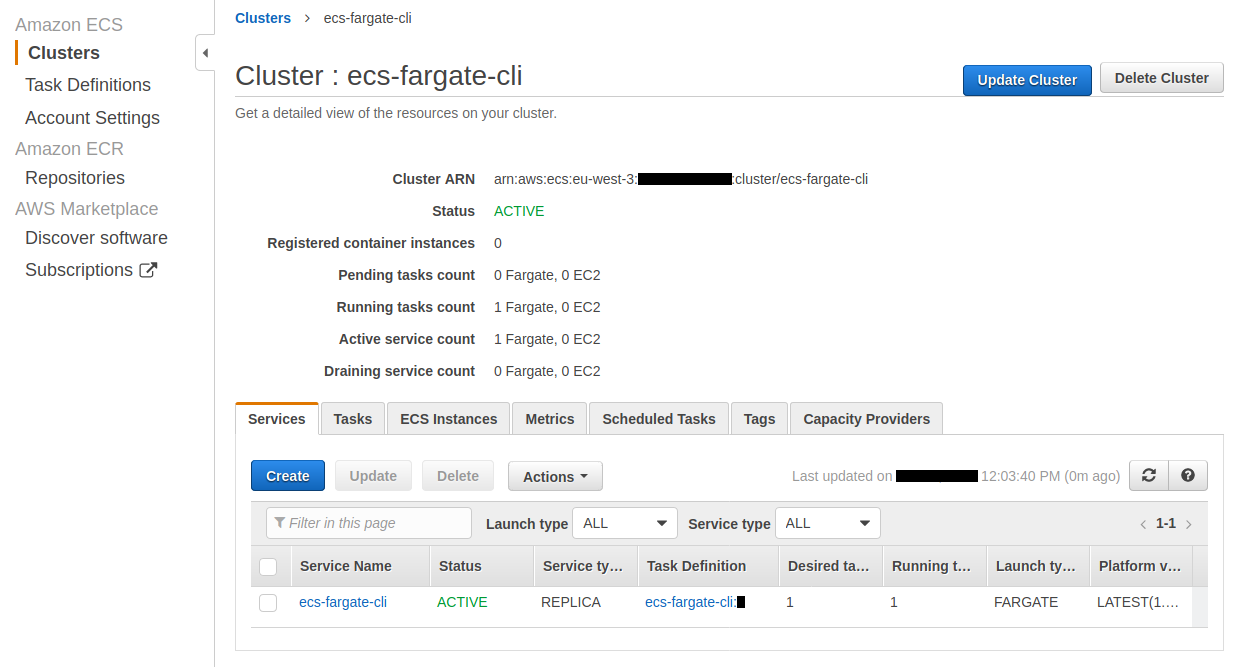
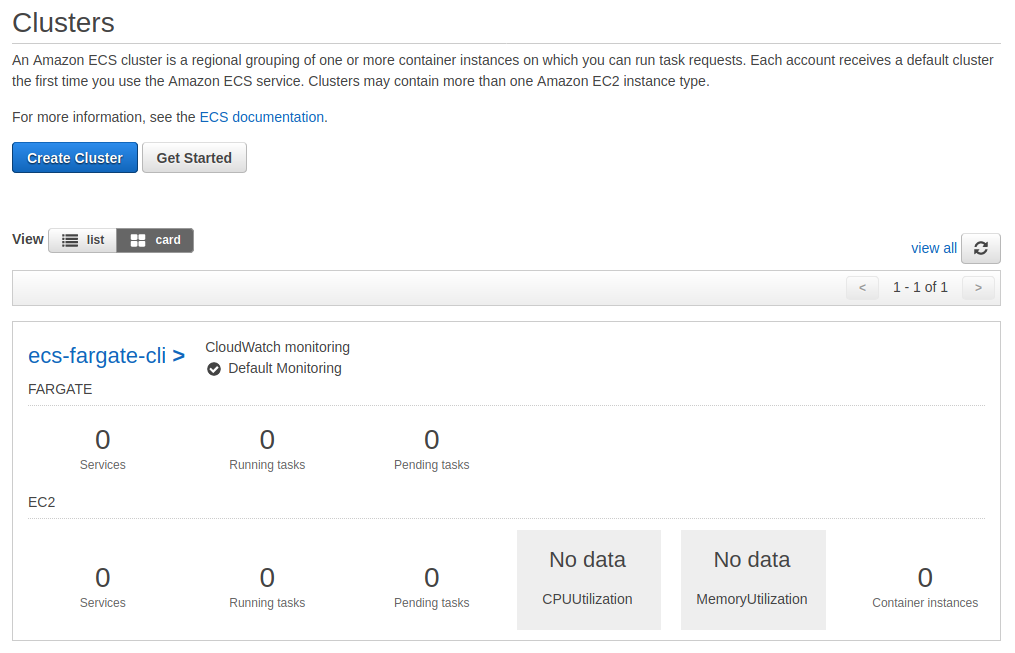
The service is created with one running task :
The running service page :
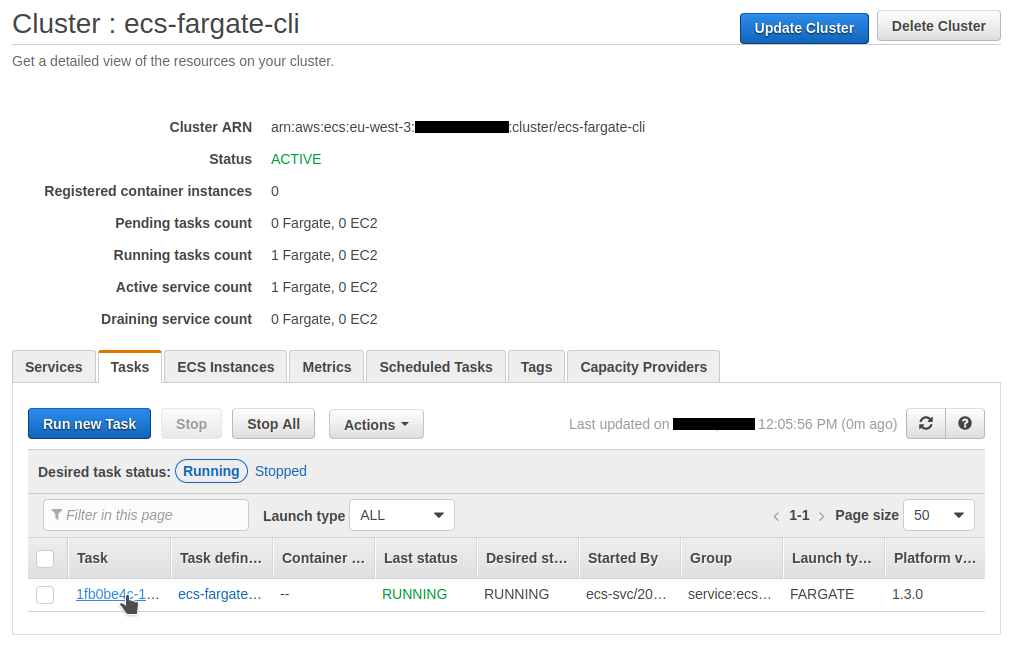
Let’s see the tab of the running task :
We get the Public IP on the details page of this task :
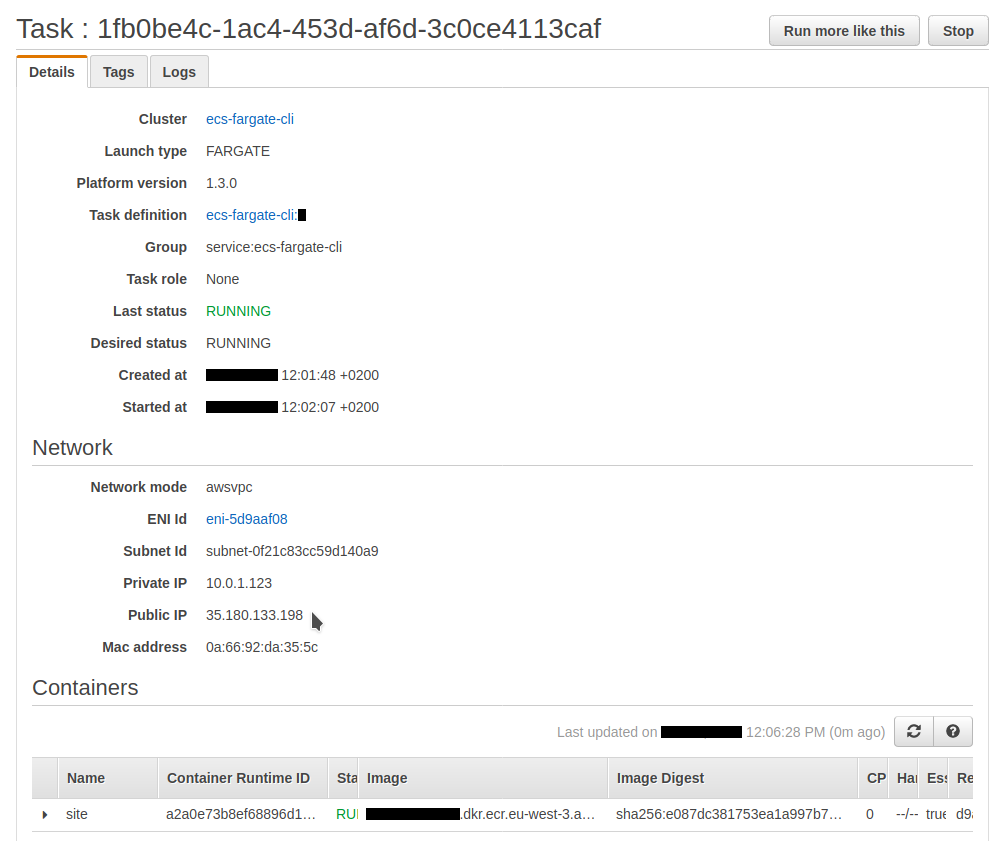
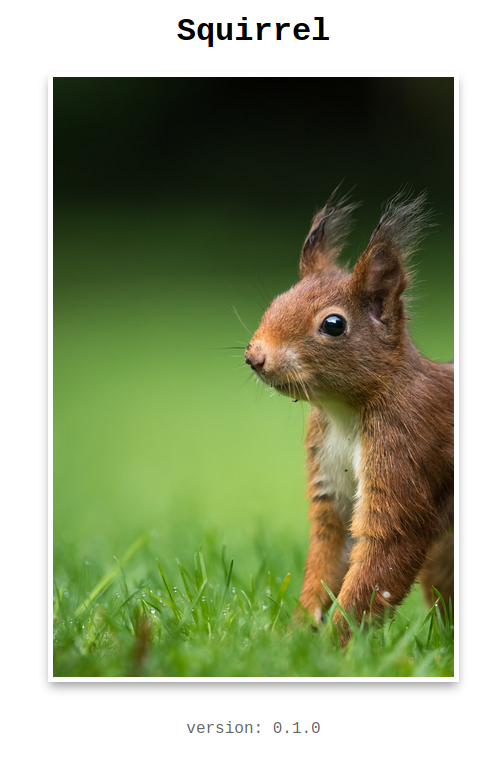
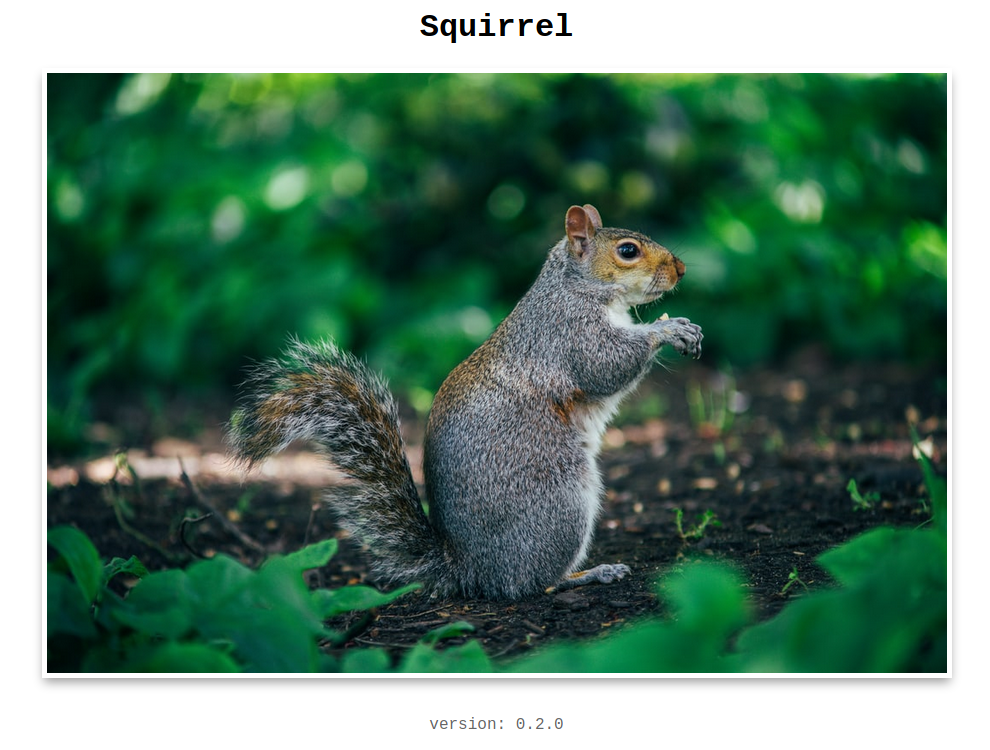
And if we open this Public IP in our browser, we see our wonderful site :
Now we can terminate the service with compose service down :
$ ecs-cli compose \
    --project-name ecs-fargate-cli \
    service down \
    --cluster-config ecs-fargate-cli
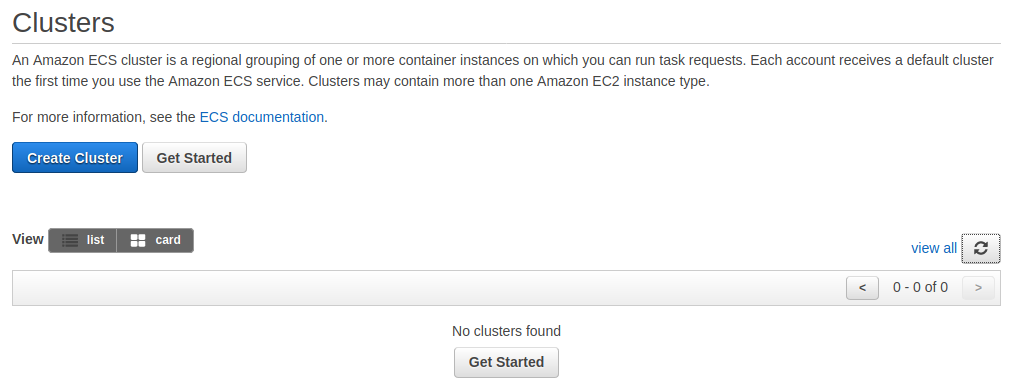
The service is terminated :
Now we can delete the cluster and the CloudFormation stack with down :
$ ecs-cli down \
    --force \
    --cluster-config ecs-fargate-cli
Everything is removed :
All these commands are combined into 2 make tasks :
service-up: # create the cluster and start a service
	./service-up.sh

service-down: # terminate the service and the cluster
	./service-down.sh
The script service-up.sh allows us to deploy a service in seconds :
# create the cluster
echo ecs-cli up...
ecs-cli up \
    --cluster-config ecs-fargate-cli \
    --tags Name=ecs-fargate-cli

# vpc id
VPC=$(aws ec2 describe-vpcs \
    --filters "Name=tag:Name,Values=ecs-fargate-cli" \
    --query "Vpcs[].VpcId" \
    --output text)
echo VPC:$VPC

# subnet 1 id
SUBNET_1=$(aws ec2 describe-subnets \
    --filters "Name=tag:Name,Values=ecs-fargate-cli" \
    --query "Subnets[0].SubnetId" \
    --output text)
echo SUBNET_1:$SUBNET_1

# subnet 2 id
SUBNET_2=$(aws ec2 describe-subnets \
    --filters "Name=tag:Name,Values=ecs-fargate-cli" \
    --query "Subnets[1].SubnetId" \
    --output text)
echo SUBNET_2:$SUBNET_2

# security group id
SG=$(aws ec2 describe-security-groups \
    --query "SecurityGroups[?VpcId == '$VPC'].GroupId" \
    --output text)
echo SG:$SG

# open the port 80
echo aws ec2 authorize-security-group-ingress...
aws ec2 authorize-security-group-ingress \
  --group-id $SG \
  --protocol tcp \
  --port 80 \
  --cidr 0.0.0.0/0 \
  --region eu-west-3

# user id
USER=$(aws sts get-caller-identity --output text --query 'Account')
echo USER:$USER

# create the docker-compose.yml file
echo create docker-compose.yml file...
sed --expression "s|{{USER}}|$USER|" \
    docker-compose.sample.yml \
    > docker-compose.yml

# create the ecs-params.yml file
echo create ecs-params.yml file...
sed --expression "s|{{SUBNET_1}}|$SUBNET_1|" \
    --expression "s|{{SUBNET_2}}|$SUBNET_2|" \
    --expression "s|{{SG}}|$SG|" \
    ecs-params.sample.yml \
    > ecs-params.yml

# create the service
echo ecs-cli compose service up...
ecs-cli compose \
  --project-name ecs-fargate-cli \
  service up \
  --create-log-groups \
  --cluster-config ecs-fargate-cli

# service status
echo ecs-cli compose service ps...
ecs-cli compose \
    --project-name ecs-fargate-cli \
    service ps \
    --cluster-config ecs-fargate-cli

# task arn
TASK=$(aws ecs list-tasks \
    --cluster ecs-fargate-cli \
    --query 'taskArns' \
    --output text)
echo TASK:$TASK

# network interface id
ENI=$(aws ecs describe-tasks \
    --cluster ecs-fargate-cli \
    --tasks "$TASK" \
    --query "tasks[0].attachments[0].details[?name == 'networkInterfaceId'].value" \
    --output text)
echo ENI:$ENI

# get the public ip
echo aws ec2 describe-network-interfaces...
aws ec2 describe-network-interfaces \
    --network-interface-ids $ENI \
    --query 'NetworkInterfaces[*].Association.PublicIp' \
    --output text