
RDS + Aurora + MySQL + PostgreSQL + Bastion + Terraform
- Create a publicly available MySQL database on RDS with Terraform
- Connect to this database and interact from the terminal or docker images
- Create a private MySQL database on RDS with Terraform
- Connect to this database from an EC2 instance within the same VPC
- Create a bastion host, an SSH tunnel and interract with the database from the terminal or the DBearer app
- Create a private PostgreSQL database on Aurora with Terraform
- Redo the same interaction tests

Install the project
Get the code from this github repository :
# download the code
$ git clone \
    --depth 1 \
    https://github.com/jeromedecoster/rds-mysql-aurora-postgres-bastion.git \
    /tmp/aws

# cd
$ cd /tmp/aws
Create a publicly accessible MySQL database on RDS
To setup the project, run the following command in the rds-mysql-public directory :
$ cd rds-mysql-public

# terraform setup
$ make setup
This command initialize Terraform
We are now deploying our infrastructure :
# terraform plan + apply (deploy)
$ make apply
The Terraform code to create the database is simple :
resource "aws_db_instance" "db_instance" {
  allocated_storage    = 10
  engine               = "mysql"
  engine_version       = "5.7"
  instance_class       = "db.t2.micro"
  identifier           = var.mysql_identifier
  username             = var.mysql_username
  password             = var.mysql_password
  parameter_group_name = "default.mysql5.7"

  db_subnet_group_name = aws_db_subnet_group.db_subnet_group.name
  vpc_security_group_ids = [aws_security_group.vpc_sg.id]

  publicly_accessible = true
  skip_final_snapshot = true
}

resource "aws_db_subnet_group" "db_subnet_group" {
  name       = "${var.project_name}-db-subnet-group"
  subnet_ids = module.vpc.public_subnets
}
The database creation require a VPC.
It is created using the famous Terraform module :
module "vpc" {
  source  = "terraform-aws-modules/vpc/aws"
  version = "3.11.5"

  name                 = var.project_name
  cidr                 = "10.0.0.0/16"
  azs                  = data.aws_availability_zones.zones.names
  public_subnets       = ["10.0.4.0/24", "10.0.5.0/24", "10.0.6.0/24"]
  enable_dns_hostnames = true
  enable_dns_support   = true
}
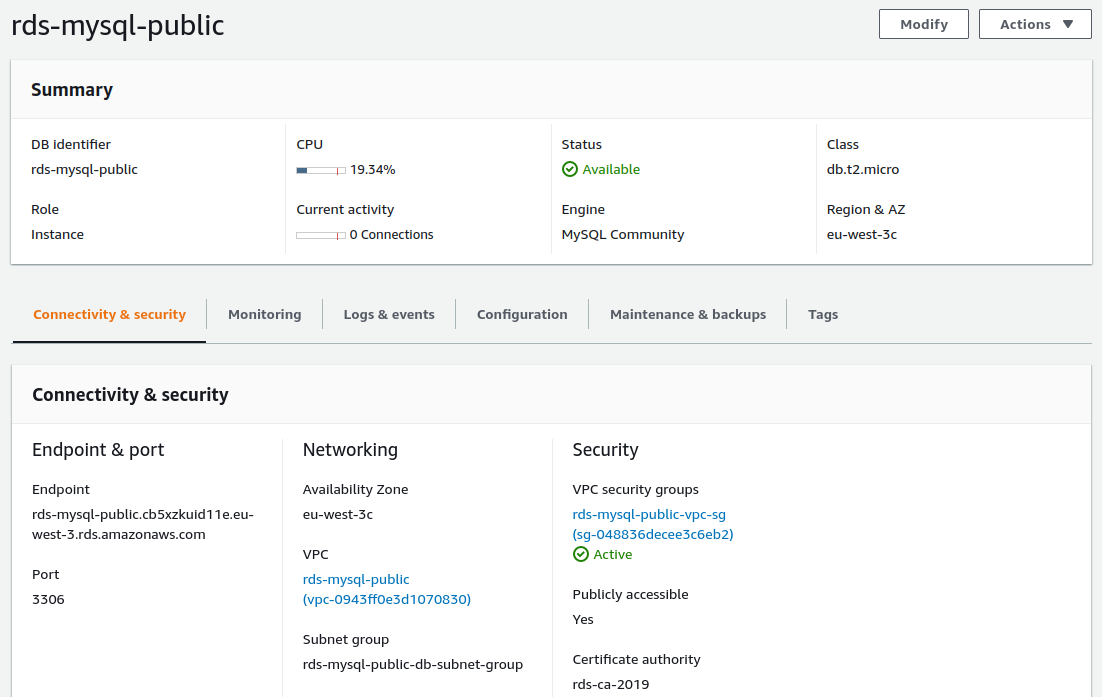
The created VPC :
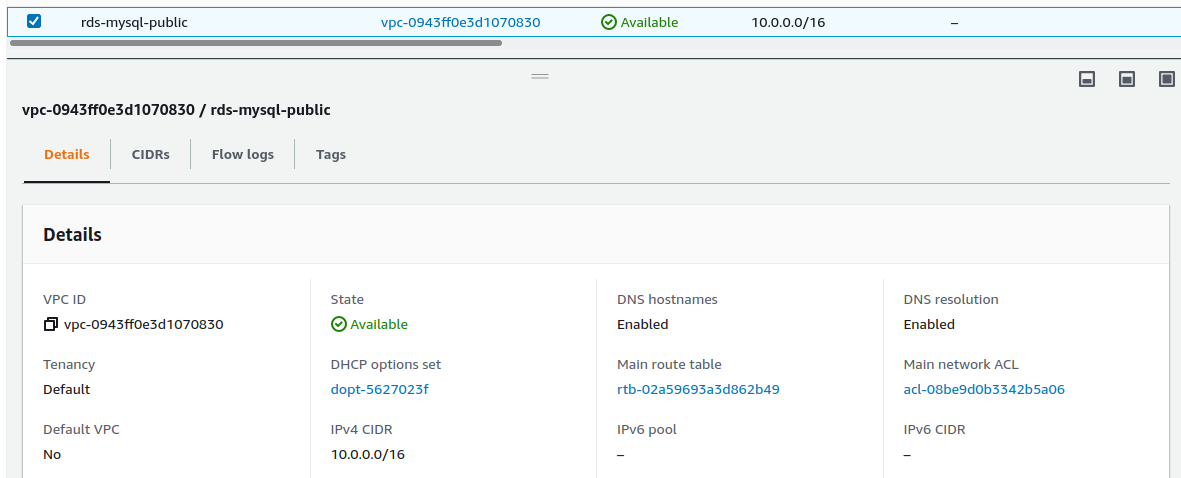
The created MySQL database :
Add data from terminal
We can setup the database and add some data using the mysql-create command :
# create database + tables + insert values
$ make mysql-create
This command use mysql (assuming it’s already installed on your machine) :
$ mysql --user=$MYSQL_USERNAME --password=$MYSQL_PASSWORD --host=$HOST < create.sql
The create.sql file is simple :
drop database if exists rds;
create database rds;
use rds;

CREATE TABLE the_beatles (
  albumName varchar(60) DEFAULT NULL,
  trackName varchar(60) DEFAULT NULL,
  trackNumber varchar(2) DEFAULT NULL,
  releaseDate datetime DEFAULT NULL
)
ENGINE = INNODB,
AVG_ROW_LENGTH = 655,
CHARACTER SET latin1,
COLLATE latin1_swedish_ci;

INSERT INTO the_beatles VALUES
('The Beatles 1967-1970 (The Blue Album)', 'Hey Jude', '13', '1968-08-26 12:00:00'),
('The Beatles (The White Album)', 'While My Guitar Gently Weeps', '7', '1968-11-22 12:00:00'),
('The Beatles 1967-1970 (The Blue Album)', 'Revolution', '14', '1968-08-26 12:00:00');
Query the database from docker images
We can connect to interact with the database using this command :
# connect to rds
$ make mysql-connect

Welcome to the MariaDB monitor.  Commands end with ; or \g.

MySQL [(none)]>
This command assume you already has mysql installed on your machine :
mysql --user=$MYSQL_USERNAME --password=$MYSQL_PASSWORD --host=$HOST
Let’s try to connect using a docker image :
# query values from 'apline' docker image
$ make mysql-query-alpine
Why from a docker image since we can assume that we already have mysql installed on our computer ?
- We might want to test things in an easy-to-remove sandbox without wanting to leave traces on our machine
- We could create a ready-made docker image for a project and use it in environments other than our own machine
This command run the alpine docker image :
docker run \
    --interactive \
    --tty \
    --rm \
    --volume $(pwd):/var/task \
    --workdir /var/task \
    --env MYSQL_USERNAME=$MYSQL_USERNAME \
    --env MYSQL_PASSWORD=$MYSQL_PASSWORD \
    --env HOST=$HOST \
    --entrypoint=/bin/sh \
    alpine entrypoint.sh
By passing some environment variables to an entrypoint script :
apk add mysql mysql-client

mysql --user=$MYSQL_USERNAME --password=$MYSQL_PASSWORD --host=$HOST --execute="source query.sql"
And the query.sql is simple :
use rds;

select * from the_beatles;
Let’s do another test using an already containerized mysql client available on the docker hub registry :
# query values from 'arey/mysql-client' docker image
$ make mysql-query-client
The docker image is built by using a simple Dockerfile.
This command is simpler and clearer :
docker run \
    --volume $(pwd):/sql \
    --interactive \
    --tty \
    arey/mysql-client \
    --user=$MYSQL_USERNAME \
    --password=$MYSQL_PASSWORD \
    --host=$HOST \
    --execute="source /sql/query.sql"
The output is shown in the terminal :
+----------------------------------------+------------------------------------+-------------+---------------------+
| albumName                              | trackName                          | trackNumber | releaseDate         |
+----------------------------------------+------------------------------------+-------------+---------------------+
| The Beatles 1967-1970 (The Blue Album) | Hey Jude                           | 13          | 1968-08-26 12:00:00 |
| The Beatles (The White Album)          | While My Guitar Gently Weeps       | 7           | 1968-11-22 12:00:00 |
| The Beatles 1967-1970 (The Blue Album) | Revolution                         | 14          | 1968-08-26 12:00:00 |
...
| The Beatles (The White Album)          | Sexy Sadie                         | 5           | 1968-11-22 12:00:00 |
| The Beatles 1967-1970 (The Blue Album) | Get Back                           | 4           | 1969-04-11 12:00:00 |
| The Beatles (The White Album)          | Yer Blues                          | 2           | 1968-11-22 12:00:00 |
+----------------------------------------+------------------------------------+-------------+---------------------+
The demonstration is over. We can delete our resources with this command :
# destroy all resources
$ make destroy
Create a private MySQL database on RDS
To setup the project, run the following command in the rds-mysql-private directory :
$ cd rds-mysql-private

# terraform setup
$ make setup
This command initialize Terraform.
We are now deploying our infrastructure :
# terraform plan + apply (deploy)
$ make apply
The Terraform code to create the database is simple :
resource "aws_db_instance" "db_instance" {
  allocated_storage    = 10
  engine               = "mysql"
  engine_version       = "5.7"
  instance_class       = "db.t2.micro"
  identifier           = var.mysql_identifier
  username             = var.mysql_username
  password             = var.mysql_password
  parameter_group_name = "default.mysql5.7"

  db_subnet_group_name = aws_db_subnet_group.db_subnet_group.name
  vpc_security_group_ids = [module.vpc.default_security_group_id]

  # private db
  publicly_accessible = false
  skip_final_snapshot = true
}

resource "aws_db_subnet_group" "db_subnet_group" {
  name       = "${var.project_name}-db-subnet-group"
  subnet_ids = module.vpc.private_subnets
}
The VPC is built with 2 public subnets and 2 private subnets :
module "vpc" {
  source  = "terraform-aws-modules/vpc/aws"
  version = "3.11.5"

  name = var.project_name
  cidr = "10.0.0.0/16"
  azs  = data.aws_availability_zones.zones.names

  public_subnets = ["10.0.1.0/24", "10.0.2.0/24"]
  # rds require at least 2 subnet to launch an instance
  private_subnets      = ["10.0.3.0/24", "10.0.4.0/24"]

  enable_dns_hostnames = true
  enable_dns_support   = true
}
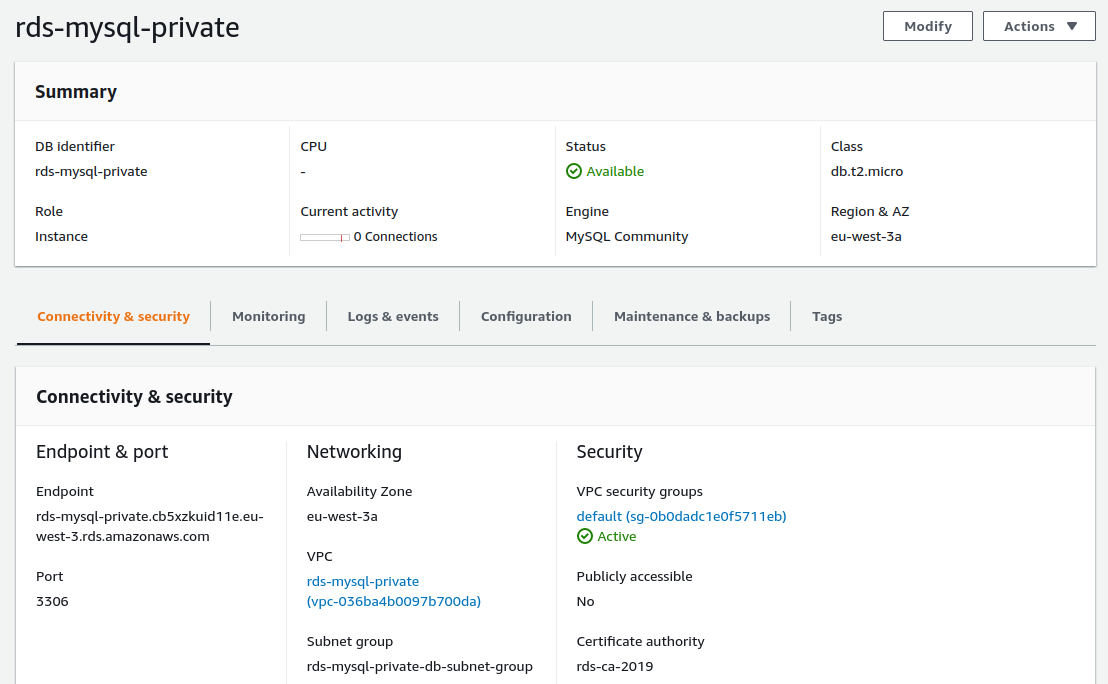
The created VPC :
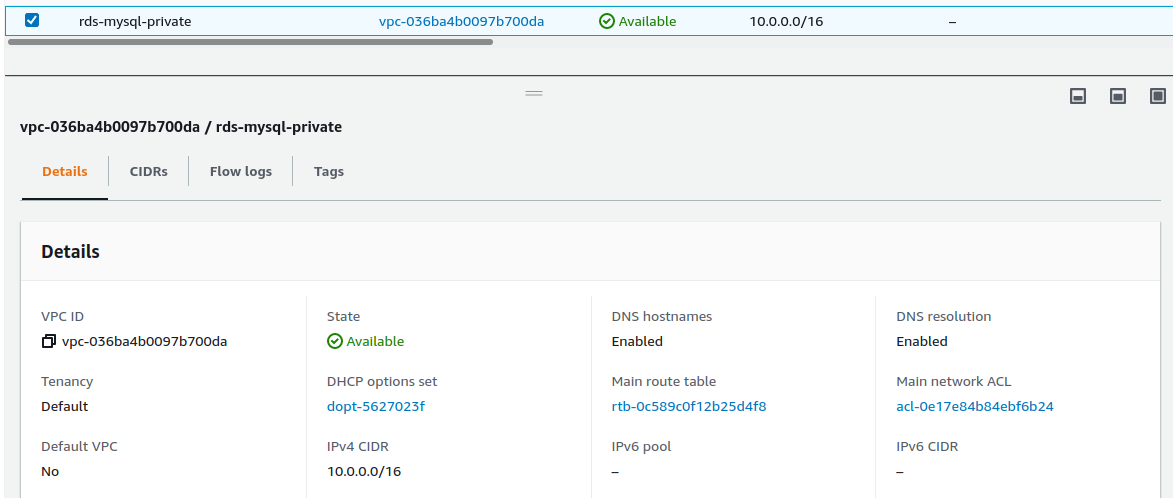
The created MySQL database :
Here are our 4 subnets :

It is important to note that the private subnets do not contain a rule with an internet gateway :
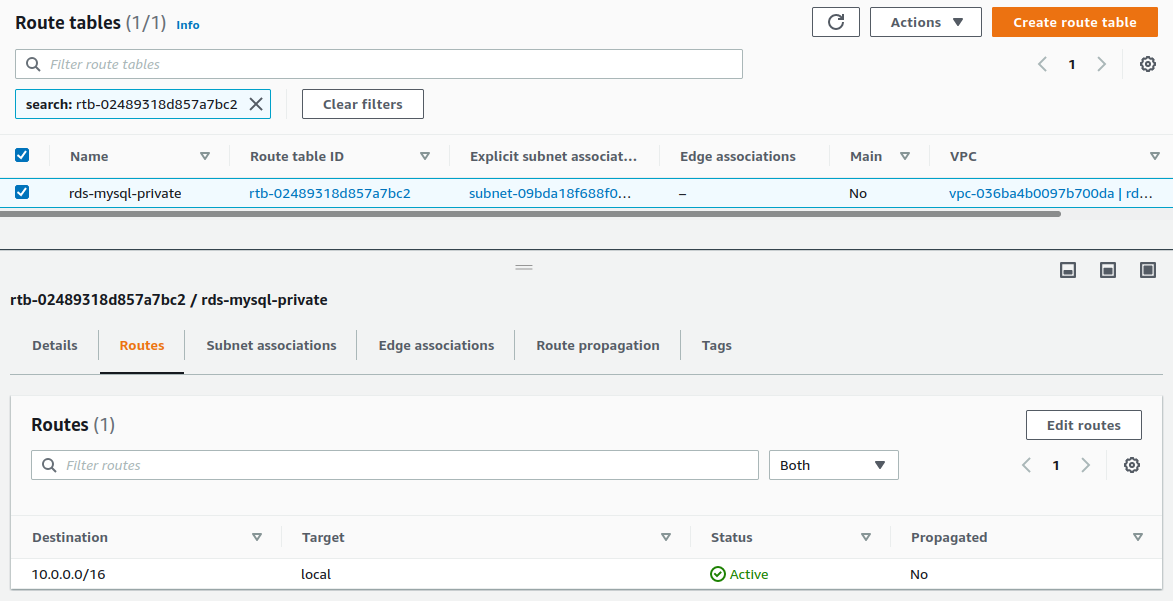
And that the public subnets have one rule with an internet gateway :
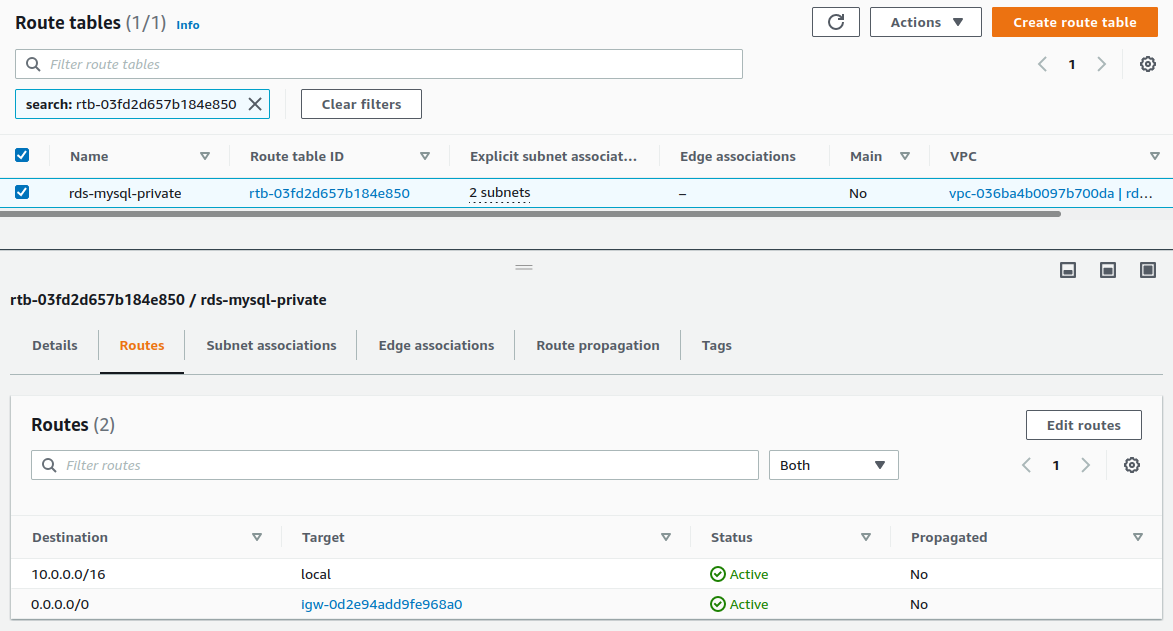
The VPC require some security setup to be private.
Allow all inbound traffic on self :
resource "aws_default_security_group" "vpc_security_group" {
  vpc_id = module.vpc.vpc_id

  # allow all inbound traffic
  ingress {
    protocol  = -1
    from_port = 0
    to_port   = 0
    self      = true
  }

  # allow all outbound traffic
  egress {
    protocol    = -1
    from_port   = 0
    to_port     = 0
    cidr_blocks = ["0.0.0.0/0"]
  }
}
And allow incoming traffic on the MySQL port only for EC2 instances that trust a specific security group :
resource "aws_security_group_rule" "mysql_ec2_instances_sg" {
  # this rule is added to the security group defined by `security_group_id`
  # and this id target the `default` security group associated with the created VPC
  security_group_id = aws_default_security_group.vpc_security_group.id

  type      = "ingress"
  protocol  = "tcp"
  from_port = 3306
  to_port   = 3306

  source_security_group_id = aws_security_group.instance.id
}
Connect from an EC2 instance
We connect to the EC2 instance with this command :
# ssh connect to the ec2 instance
$ make ec2-connect
This command connects like this :
# SSH add key to known_hosts to not be prompt by :
# 'key fingerprint ... Are you sure you want to continue connecting (yes/no) ?'
ssh-keyscan -t rsa $EC2_PUBLIC_DNS >> ~/.ssh/known_hosts

ssh -i "$PROJECT_NAME.pem" ec2-user@$EC2_PUBLIC_DNS
We can connect to the database by copy-pasting the command displayed in the terminal :
$ mysql --user=admin --password=adminpass --host=rds-mysql-private.xxx.eu-west-3.rds.amazonaws.com

Welcome to the MariaDB monitor.  Commands end with ; or \g.

MySQL [(none)]> show databases;
+--------------------+
| Database           |
+--------------------+
| information_schema |
| innodb             |
| mysql              |
| performance_schema |
| sys                |
+--------------------+
So we know how to create EC2 instances that can interact with our private database.
Query the database by using a bastion host and an SSH tunnel
We will now connect to the database using a temporary bastion host.
This machine will allow us to access the database through an SSH tunnel that we will also set up.
This command creates our bastion instance :
# create an ec2 bastion host
$ make bastion-create
It is important that our bastion is created with these options :
--security-group-ids: use the security group allowing connection via port 3306.--subnet-id: with one of the 2 publicly accessible subnets.--associate-public-ip-address: create a public address to be able to connect to it.
aws ec2 run-instances \
    --image-id $AMI_ID \
    --count 1 \
    --instance-type t2.micro \
    --security-group-ids $SECURITY_GROUP_ID \
    --subnet-id $SUBNET_ID \
    --iam-instance-profile "Name=$PROJECT_NAME-ec2-profile" \
    --associate-public-ip-address \
    --key-name $PROJECT_NAME \
    --tag-specifications "ResourceType=instance,Tags=[{Key=Name,Value=$PROJECT_NAME-bastion}]" \
    --query 'Instances[0].InstanceId' \
    --region $AWS_REGION \
    --output text
This command creates our SSH tunnel :
# create a ssh tunnel
$ make ssh-tunnel-create
The tunnel is done via this line of script :
ssh -i "$KEY_FILE" -f -N -L 3307:$HOST:3306 ec2-user@$EC2_PUBLIC_DNS -v
We can connect by copy-pasting the command displayed in another terminal window :
# in another terminal window
$ mysql --user=admin --password=adminpass --port=3307 --host=127.0.0.1

MySQL [(none)]> drop database if exists rds;
MySQL [(none)]> create database rds;
MySQL [(none)]> show databases;
+--------------------+
| Database           |
+--------------------+
| information_schema |
| innodb             |
| mysql              |
| performance_schema |
| rds                |
| sys                |
+--------------------+
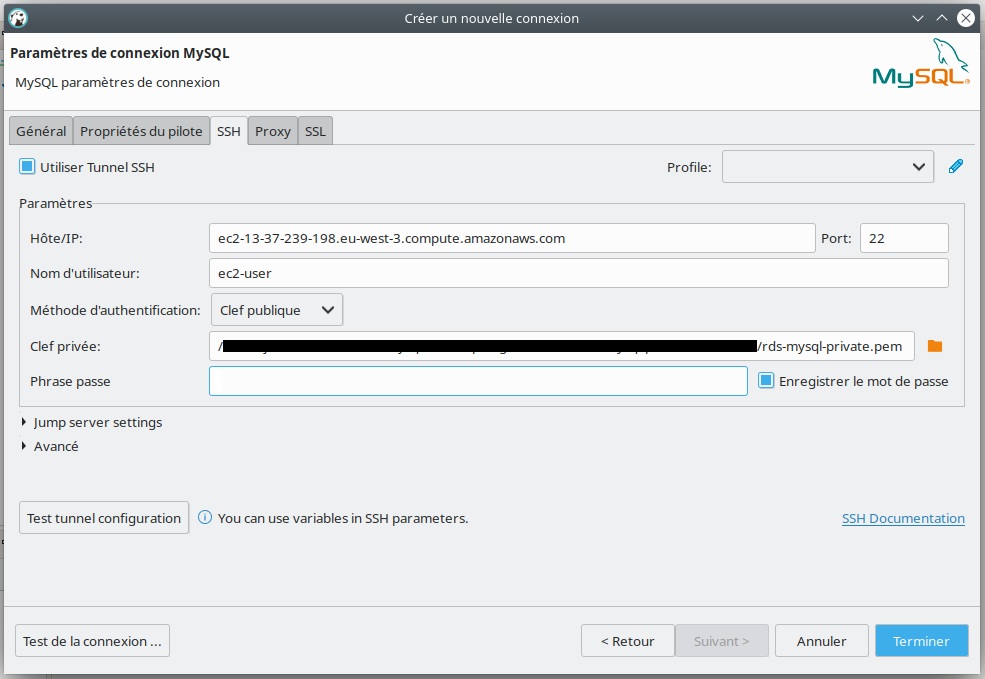
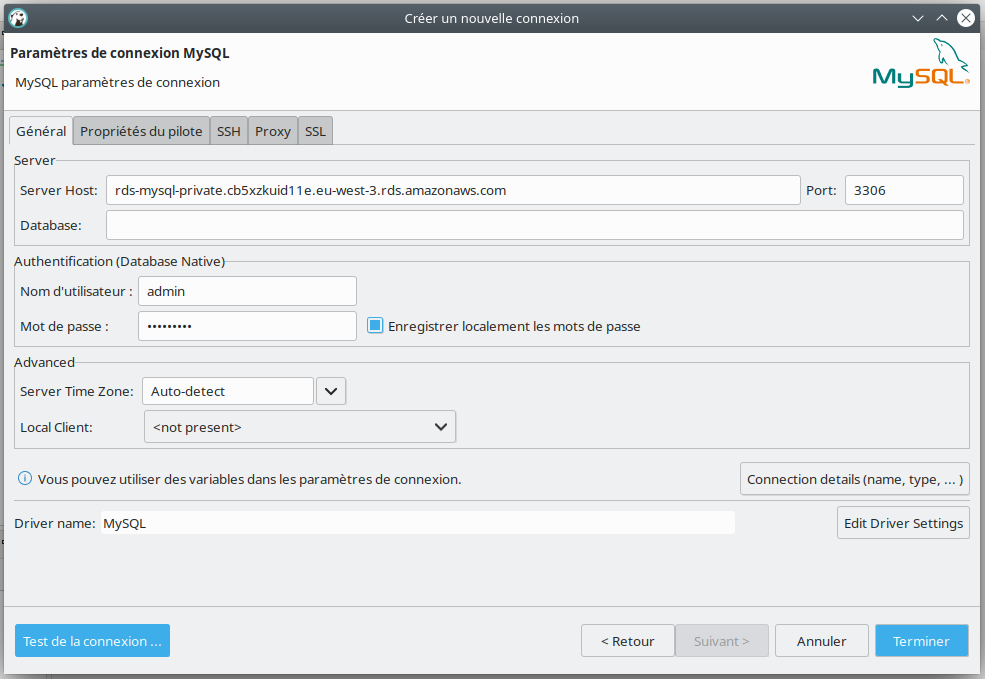
Query the database by using a bastion host and DBearer
Connecting and interacting with the database via the terminal is a good exercise that can be valid in scripting and automation operations.
If we want to interact with the database, we will use an application to make our life easier :
We install DBeaver Community Edition :
# https://dbeaver.io/download/
$ sudo snap install dbeaver-ce
To be able to connect, we retrieve the information via this command :
# get bastion + database endpoints
$ make bastion-info
To connect, we go through these steps…
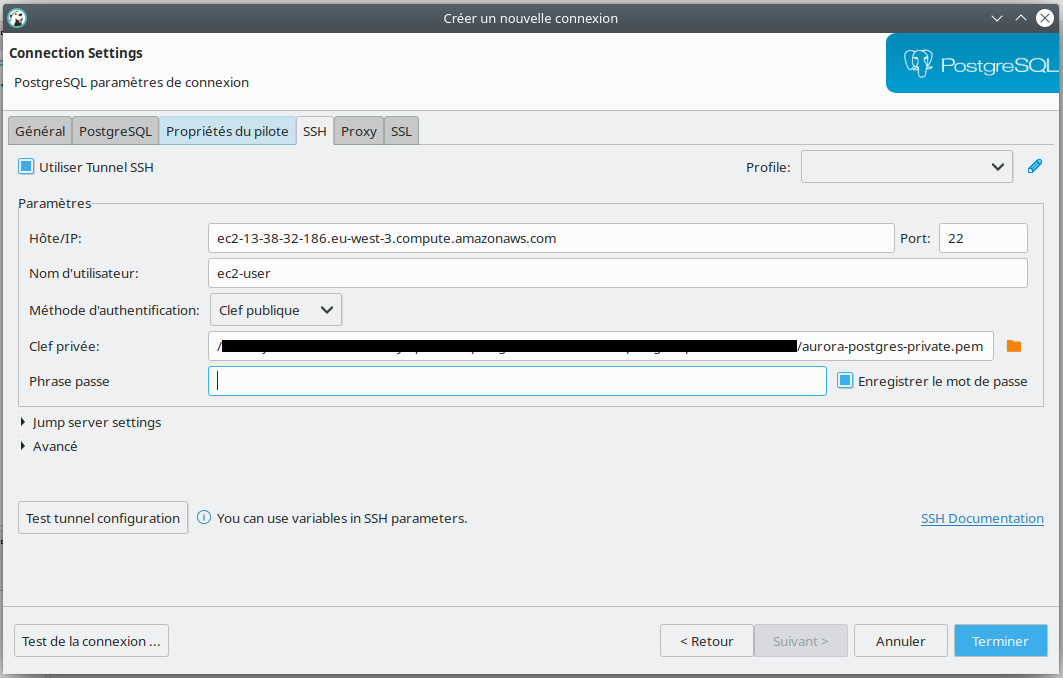
The SSH tunnel :
The main panel :
Create a script panel :
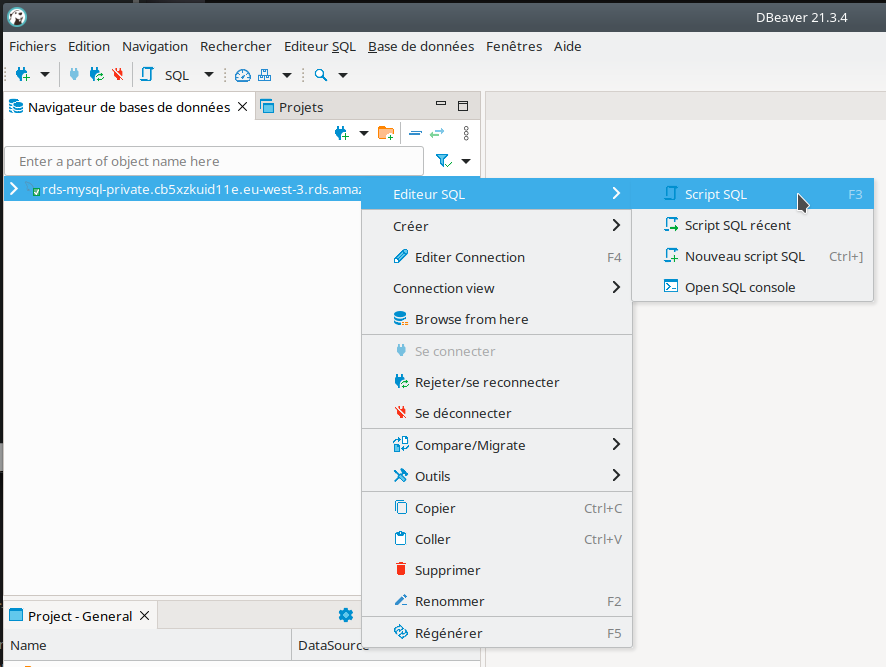
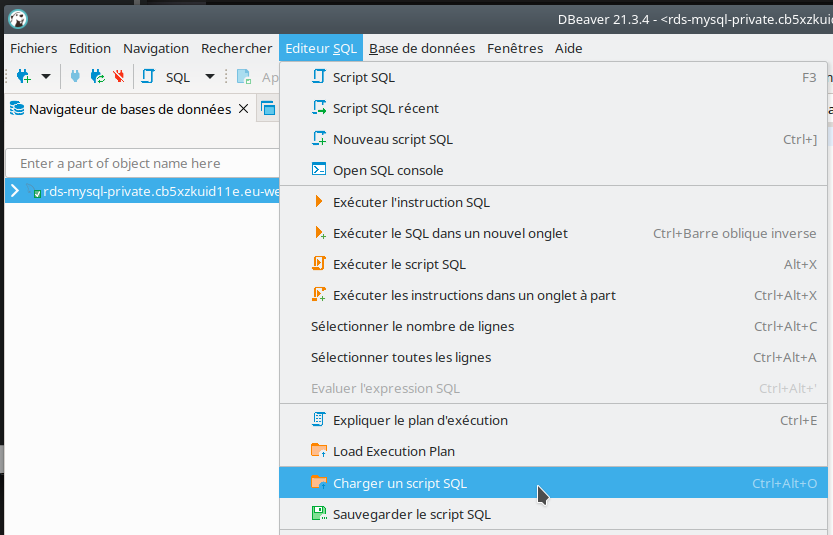
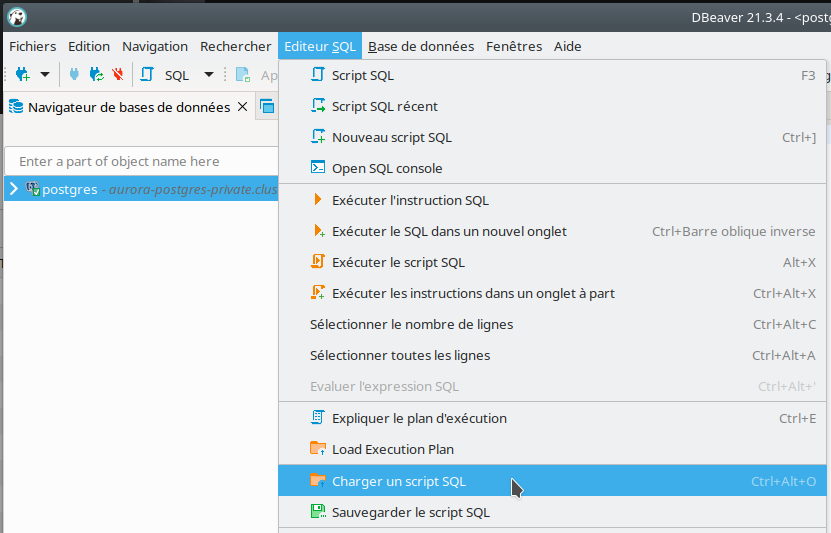
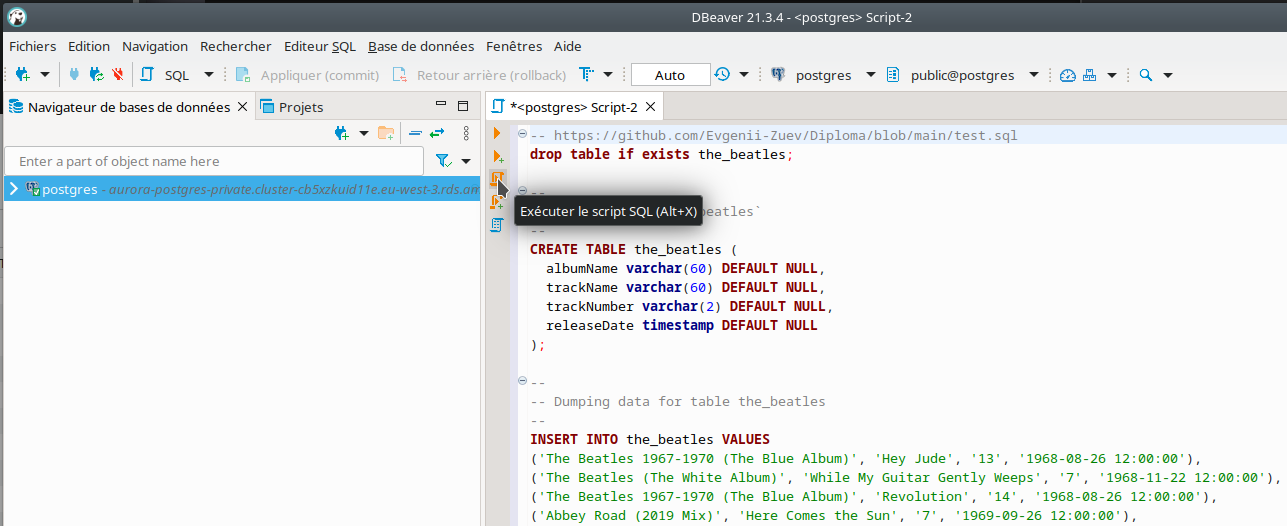
Load a SQL script :
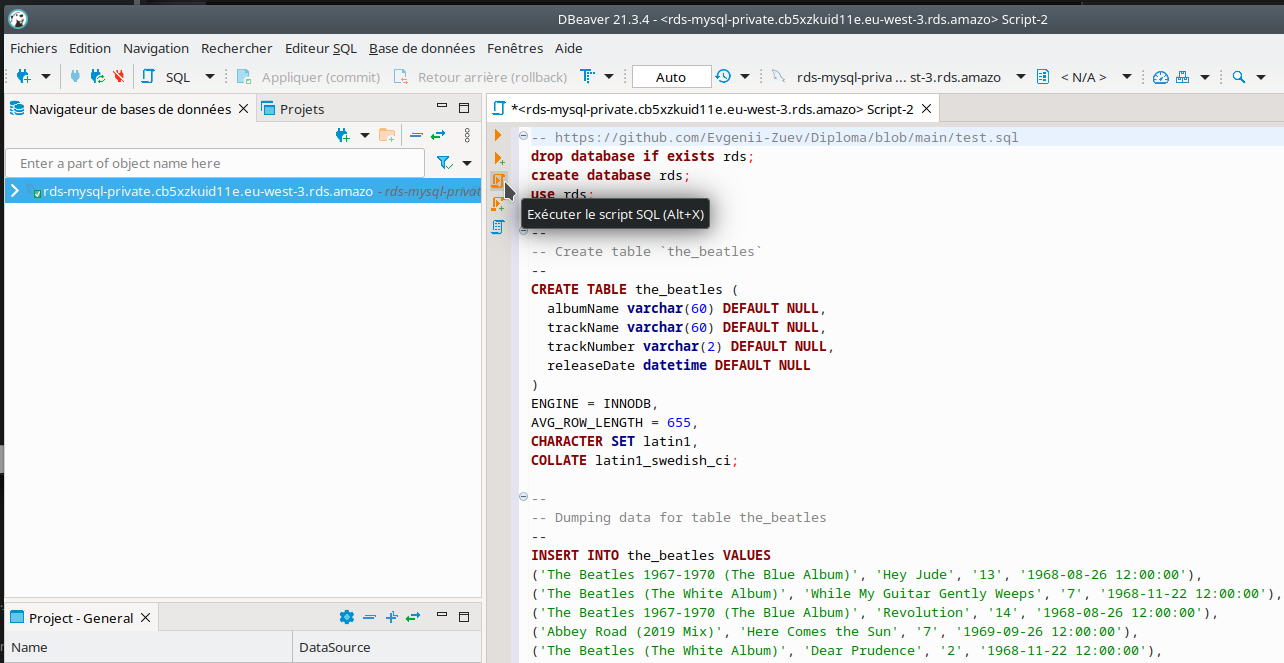
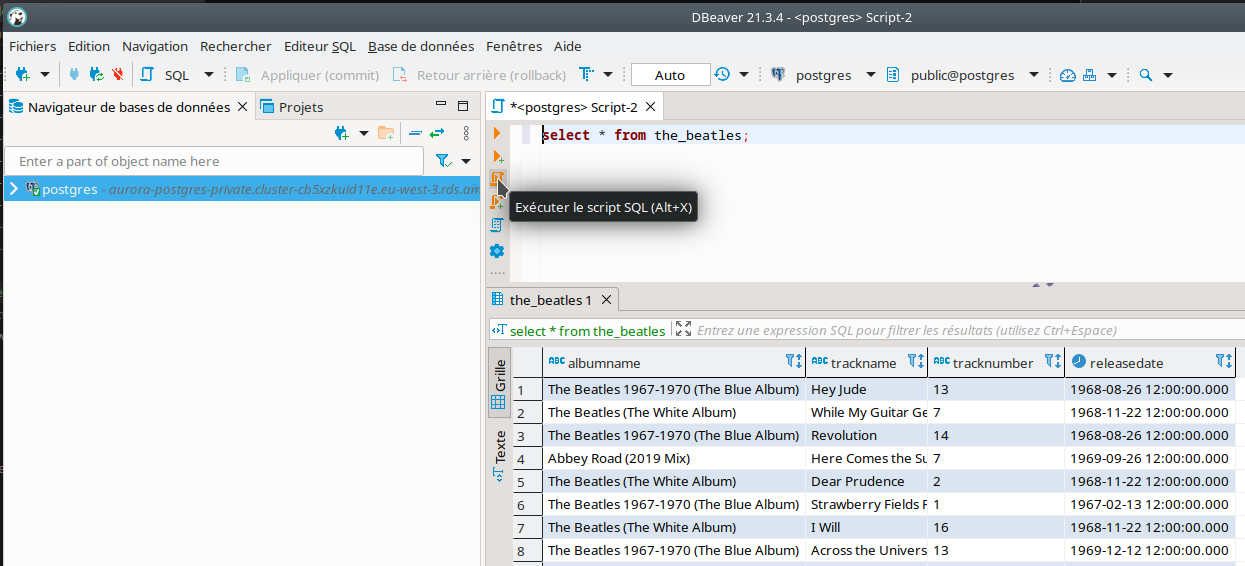
Run the script :
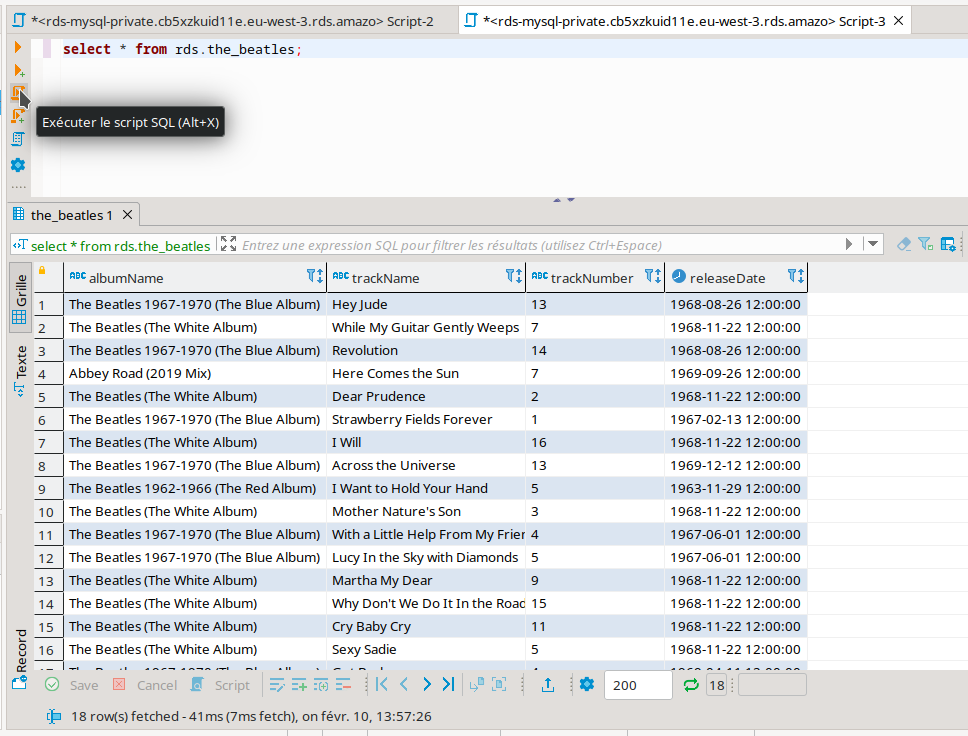
The connection works, we can query the database :
The demonstration is over. We can delete our resources with these commands :
# close the ssh tunnel
$ make ssh-tunnel-close

# close the ec2 bastion host
$ make bastion-terminate

# destroy all resources
$ make destroy
Warning : deleting resources can take a long time. It is important to verify via the AWS website that the resources have indeed disappeared.
Create a private PostgreSQL database on Aurora
To setup the project, run the following command in the aurora-postgres-private directory :
$ cd aurora-postgres-private

# terraform setup
$ make setup
This command initialize Terraform.
We are now deploying our infrastructure :
# terraform plan + apply (deploy)
$ make apply
The Terraform code to create an Aurora database is bigger than for simple RDS :
resource "aws_rds_cluster" "cluster" {
  engine                  = "aurora-postgresql"
  engine_mode             = "provisioned"
  engine_version          = "12.7"
  cluster_identifier      = var.project_name
  master_username         = var.postgres_username
  master_password         = var.postgres_password

  db_subnet_group_name    = aws_db_subnet_group.db_subnet_group.name

  backup_retention_period = 7
  skip_final_snapshot     = true
}

resource "aws_rds_cluster_instance" "cluster_instances" {
  identifier         = "${var.project_name}-${count.index}"
  count              = 1
  cluster_identifier = aws_rds_cluster.cluster.id
  instance_class     = "db.t3.medium"
  engine             = aws_rds_cluster.cluster.engine
  engine_version     = aws_rds_cluster.cluster.engine_version

  publicly_accessible = false
}

resource "aws_db_subnet_group" "db_subnet_group" {
  name = "${var.project_name}-db-subnet-group"
  subnet_ids = module.vpc.private_subnets
}
The VPC is created with 2 public subnets and 2 private subnets using the terraform-aws-vpc module, as before :
public_subnets = ["10.0.1.0/24", "10.0.2.0/24"]
# rds require at least 2 subnet to launch an instance
private_subnets      = ["10.0.3.0/24", "10.0.4.0/24"]
The VPC require some security setup to be private.
Allow all inbound traffic on self and allow incoming traffic on the PostgreSQL port only for EC2 instances that trust a specific security group :
resource "aws_security_group_rule" "postgresql_ec2_instances_sg" {
  security_group_id = aws_default_security_group.vpc_security_group.id

  type      = "ingress"
  protocol  = "tcp"
  from_port = 5432
  to_port   = 5432

  source_security_group_id = aws_security_group.instance.id
}
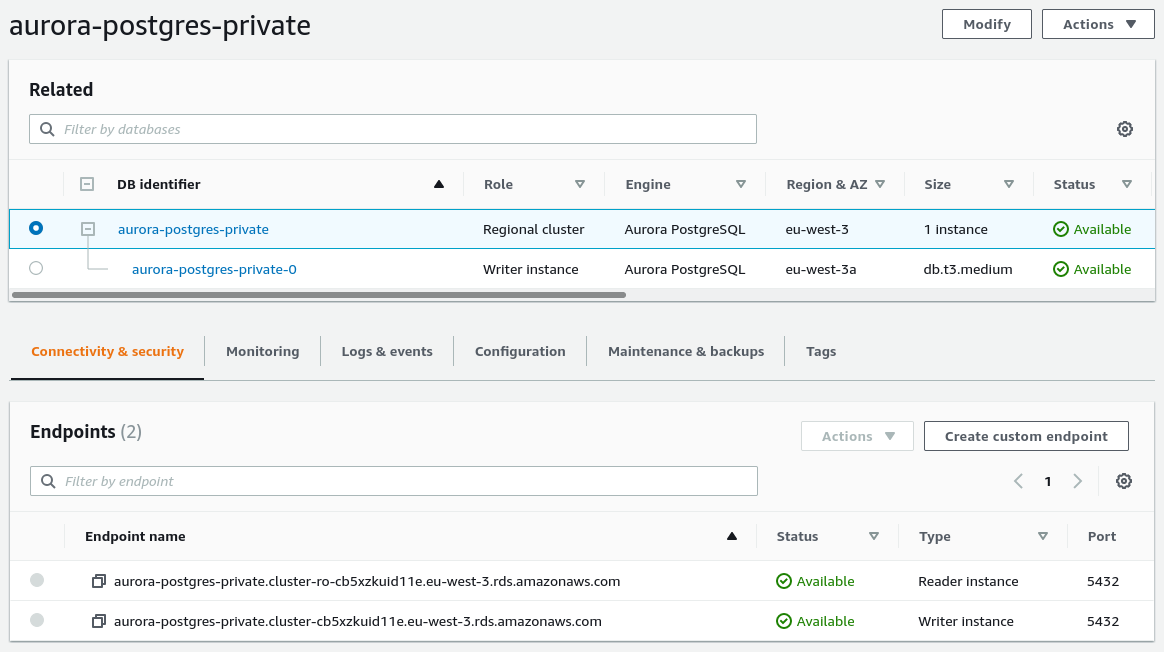
The Aurora PostgreSQL database :
Connect from an EC2 instance
We connect to the EC2 instance with this command :
# ssh connect to the ec2 instance
$ make ec2-connect
We can connect to the database by copy-pasting the command displayed in the terminal :
$ psql psql postgresql://master:masterpass@aurora-postgres-private.cluster-xxxx.eu-west-3.rds.amazonaws.com:5432/postgres?sslmode=require

postgres=> \l
                                  Liste des bases de données
    Nom    | Propriétaire | Encodage | Collationnement | Type caract. |    Droits d accès
-----------+--------------+----------+-----------------+--------------+-----------------------
 postgres  | master       | UTF8     | en_US.UTF-8     | en_US.UTF-8  |
 rdsadmin  | rdsadmin     | UTF8     | en_US.UTF-8     | en_US.UTF-8  | rdsadmin=CTc/rdsadmin
So we know how to create EC2 instances that can interact with our private database.
Query the database by using a bastion host and a ssh tunnel
We will now connect to the database using a temporary bastion host through an SSH tunnel.
This command creates our bastion instance :
# create an ec2 bastion host
$ make bastion-create
This command creates our SSH tunnel :
# create a ssh tunnel
$ make ssh-tunnel-create
We can connect by copy-pasting the command displayed in the terminal :
$ psql postgresql://master:masterpass@127.0.0.1:5433/postgres?sslmode=require

postgres=> \l
                                  List of databases
   Name    |  Owner   | Encoding |   Collate   |    Ctype    |   Access privileges
-----------+----------+----------+-------------+-------------+-----------------------
 postgres  | master   | UTF8     | en_US.UTF-8 | en_US.UTF-8 |
 rdsadmin  | rdsadmin | UTF8     | en_US.UTF-8 | en_US.UTF-8 | rdsadmin=CTc/rdsadmin
Query the database by using a bastion host and DBearer
To be able to connect, we retrieve the information via this command :
# get bastion + database endpoints
$ make bastion-info
To connect, we go through these steps…
The SSH tunnel :
The main panel :
Load a SQL script :
Run the script :
The connection works, we can query the database :
The demonstration is over. We can delete our resources with these commands :
# close the ssh tunnel
$ make ssh-tunnel-close

# close the ec2 bastion host
$ make bastion-terminate

# destroy all resources
$ make destroy